The allowed sites above may contain links that point to external sites. It is the responsibility of the candidate not to click on any links that cause them to navigate to a domain that is not allowed.
DENY all traffic to an application(アプリケーションへの全てのトラフィックを拒否する)
LIMIT traffic to an application(アプリケーションへのトラフィックを制限する)
ALLOW all traffic to an application(アプリケーションへの全てのトラフィックを許可する)
✅ Namespaces
DENY all non-whitelisted traffic in the current namespace(現在の Namespace でホワイトリストに登録されていない全てのトラフィックを拒否する)
DENY all traffic from other namespaces(他の Namespace からの全てのトラフィックを拒否する)
ALLOW traffic to an application from all namespaces(全ての Namespace からアプリケーションへのトラフィックを許可する)
ALLOW all traffic from a namespace(Namespace からの全てのトラフィックを許可する)
ALLOW traffic from some pods in another namespace(他の Namespace の一部の Pod からのトラフィックを許可する)
✅ Serving External Traffic
ALLOW traffic from external clients(外部クライアントからのトラフィックを許可する)
✅ Advanced
ALLOW traffic only to certain port numbers of an application(アプリケーションの特定のポート番号へのトラフィックのみを許可する)
ALLOW traffic from apps using multiple selectors(複数のセレクターを使ってアプリケーションからのトラフィックを許可する)
✅ Controlling Outbound (Egress) Traffic
DENY egress traffic from an application(アプリケーションからの外向きのトラフィックを拒否する)
DENY all non-whitelisted egress traffic in a namespace(現在の Namespace でホワイトリストに登録されていない全ての外向きのトラフィックを拒否する)
LIMIT egress traffic to the cluster(クラスターへの外向きのトラフィックを制限する)
検証環境
「Kubernetes Network Policy Recipes」の紹介も兼ねて,レシピをいくつか試してみる.今回は以下の検証環境を前提にする.なお,レシピ(手順書)に含まれている kubectl run コマンドの --generator=run-pod/v1 オプションは特に必要なく,コマンドは一部変えている.
Kubernetes : v1.20.1
Calico : v3.14.2
DENY all traffic to an application(アプリケーションへの全てのトラフィックを拒否する)
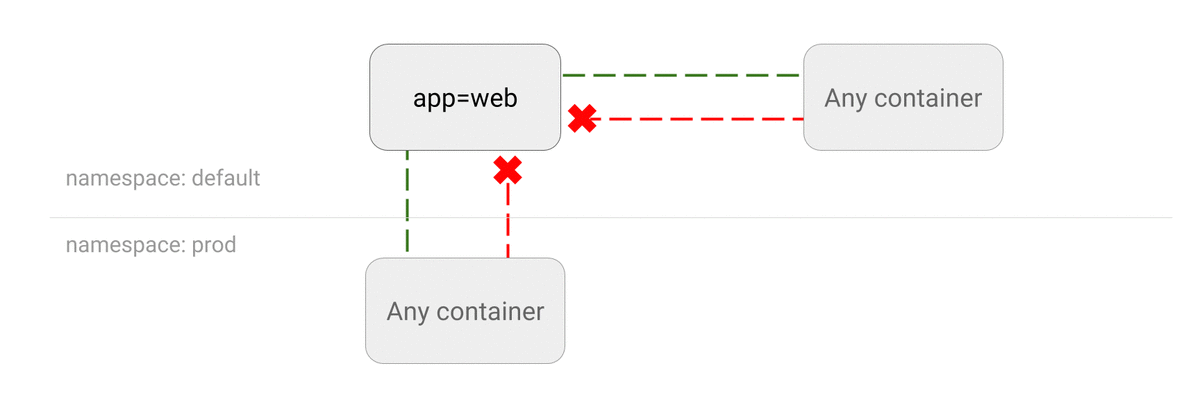
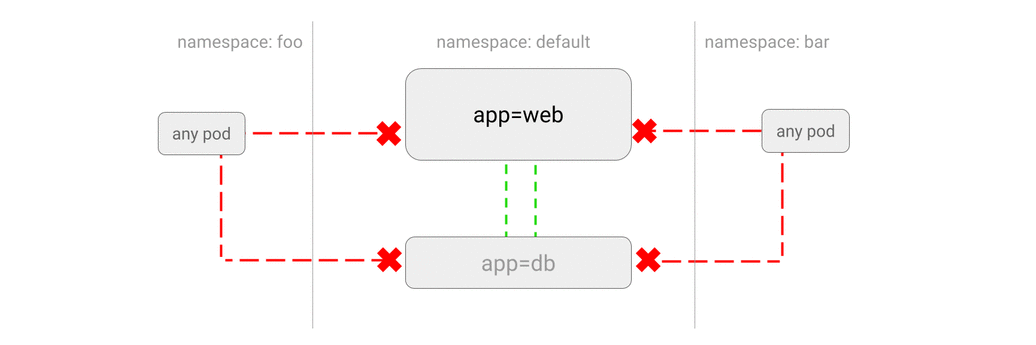
「DENY all traffic to an application」レシピでは,Labelapp=web を持ったアプリケーション Pod へのトラフィックを拒否する.さっそく試していく!まず,defaultNamespace に Labelapp=web を持ったアプリケーション Pod と Service を作る.
$ kubectl run web --image nginx --labelsapp=web --expose--port80
service/web created
pod/web created
次にアプリケーション Pod に対してリクエストを送る Pod を defaultNamespace に作る(図だと右側にある Any container).Pod の中で wget コマンドを実行すると,正常に nginx に接続できる.
$ kubectl run --rm-it--image alpine test-$RANDOM-- sh
/ # wget -qO- http://web<!DOCTYPE html><html><head><title>Welcome to nginx!</title>
(中略)
</html>
$ kubectl run --rm-it--image alpine test-$RANDOM-- sh
/ # wget -qO- --timeout=2 http://web
wget: download timed out
DENY all traffic from other namespaces(他の Namespace からの全てのトラフィックを拒否する)
「DENY all traffic from other namespaces」レシピでは,他の Namespace からのトラフィックを拒否する.さっそく試していく!まず,さっきと同じように defaultNamespace に Labelapp=web を持ったアプリケーション Pod と Service を作る.
$ kubectl run web --image nginx --labelsapp=web --expose--port80
service/web created
pod/web created
動作確認をするため,今回は defaultNamespace の Pod と fooNamespace の Pod のそれぞれから wget コマンドを実行する(図だと左側にある any pod と中央下にある app=db).同じ defaultNamespace からは正常に接続できて,別の fooNamespace からはタイムアウトになった.期待通りに Network Policy が適用されている.
$ kubectl run test-$RANDOM--namespace=default--rm-it--image alpine -- sh
/ # wget -qO- --timeout=2 http://web.default<!DOCTYPE html><html><head><title>Welcome to nginx!</title>
$ kubectl run test-$RANDOM--namespace=foo--rm-it--image alpine -- sh
/ # wget -qO- --timeout=2 http://web.default
wget: download timed out
ALLOW traffic only to certain port numbers of an application(アプリケーションの特定のポート番号へのトラフィックのみを許可する)
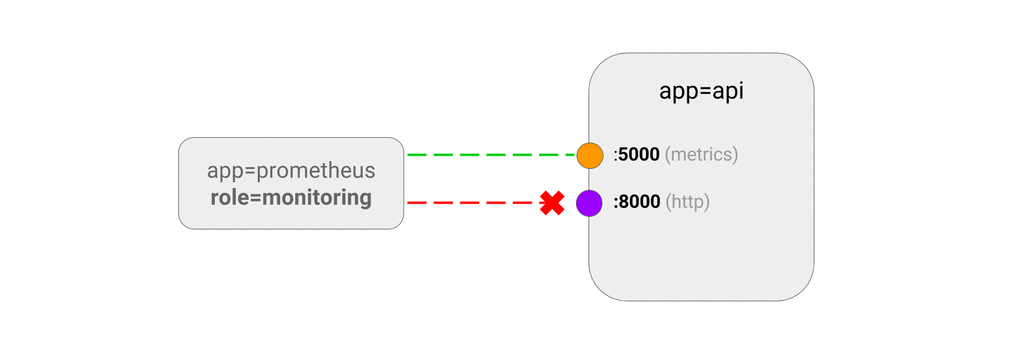
「ALLOW traffic only to certain port numbers of an application」レシピでは,特定のポートへのトラフィックを許可する.さっそく試していく!まず「5000 ポート」と「8000 ポート」を許可したサンプルイメージ ahmet/app-on-two-ports を使って defaultNamespace に Pod を作る.さらに「5001 ポート」と「8001 ポート」にマッピングをした Service を作る.
$ kubectl run apiserver --image ahmet/app-on-two-ports --labelsapp=apiserver
pod/apiserver created
$ kubectl create service clusterip apiserver \--tcp 8001:8000 \--tcp 5001:5000
service/apiserver created
Kubernetes のドキュメントを読んでいたら kubectl create コマンドで --edit オプションが使えると書いてあった.kubectl create -h コマンドでヘルプを確認したところ Edit the API resource before creating と書いてある.簡単に言うと kubectl create コマンドでマニフェストを適用する前に編集できる.今まで使ったことがなく試してみた!
You can use kubectl create --edit to make arbitrary changes to an object before it is created. Here's an example:
$ kubectl create service clusterip my-svc --clusterip="None" -o yaml --dry-run=client > /tmp/srv.yaml
$ kubectl create --edit -f /tmp/srv.yaml
Suppose you have the URL of an object configuration file. You can use kubectl create --edit to make changes to the configuration before the object is created. This is particularly useful for tutorials and tasks that point to a configuration file that could be modified by the reader.