Build Your Own Radar サービスに入力する Technology Radar ファイルとしては Google Sheets / CSV / JSON を使うことができて,もし Build Your Own Radar を企業やチームで構築するなら Technology Radar ファイルを「GitHub 管理」したくなると思う.
今回は検証として,GitHub に CSV ファイルをコミットしたら GitHub Actions と Playwright for Python を組み合わせて「自動的に Technology Radar を構築する仕組み」を試してみた.構成はザッと以下のような感じで,最終的に Playwright for Python で Build Your Own Radar の "スクリーンショット" と "PDF" を取得して GitHub Actions のアーティファクトに保存する.
.github/workflows/byor.yaml
GitHub Actions のワークフローを以下のように構成した.
まず,1点目のポイントは GitHub Actions の「サービスコンテナ」を使っているところで,ワークフローの中に Build Your Own Radar コンテナを起動して http://localhost/ でアクセスできるようにしている.また CSV ファイルを読み込ませるために volumes を指定してホスト側をマウントしている.
from playwright.sync_api import sync_playwright
from time import sleep

with sync_playwright() as p:
    browser = p.chromium.launch()
    page = browser.new_page()

    page.goto('http://localhost/')

    page.locator('input[name="sheetId"]').fill('http://localhost/files/radar.csv')
    page.locator('a.button').click()

    # Wait for "Your Technology Radar will be available in just a few seconds"
    page.wait_for_selector('div#radar')

    page.screenshot(path='artifacts/byor.png', full_page=True)
    page.pdf(path='artifacts/byor.pdf', format='A4')

    browser.close()
「Build Your Own Radar (BYOR)」を使うと Thoughtworks 社が毎年2回ほど出している Technology Radar と同じフォーマットで「自分だけの Technology Radar」を構築できる❗️
企業の技術戦略を策定してどんなテクノロジー組織を目指しているのかを可視化したり,チームでどんなテクノロジーを今後採用したいのかを可視化したりできる.チーム間で Build Your Own Radar を共有して情報交換をするのも良さそう.チームイベントやレトロスペクティブなどの場で Build Your Own Radar を構築してみるのはいかがでしょうか✌
$ docker extension --help
Usage: docker extension [OPTIONS] COMMAND
Manages Docker extensions
Options:
--socket string The Desktop extension manager socket
Management Commands:
dev Extension development helpers
Commands:
init Create a new Docker Extension based on a template.
install Install a Docker extension with the specified image
ls List installed Docker extensions
rm Remove a Docker extension
share Generate a link to share the extension.
update Remove and re-install a Docker extension
validate Validate an extension image or metadata file
version Print the client and server versions
Run 'docker extension COMMAND --help'for more information on a command.
$ docker extension dev --help
Usage: docker extension dev COMMAND
Extension development helpers
Commands:
debug Set the debug mode for an extension
reset Reset the source and disables the debug mode for the extension UI
ui-source Set a new sourcefor the extension UI
Run 'docker extension dev COMMAND --help'for more information on a command.
🐳 検証環境
今回は Docker Desktop for Mac v4.16.2 と,以下の Docker Extensions を検証環境として使う.
$ docker extension version
Client Version: v0.2.17
Server API Version: 0.3.3
$ docker extension init my-extension
? Title: my-extension
? Description: my-extension
? Vendor: kakakakakku
? Image Repository where the extension will be pushed: kakakakakku/my-extension

(中略)

Creating a Go backend service...
Initializing new go module...
Creating a React app...
Copying ui dir...
Renaming some files...
Installing npm packages, this may take a few minutes...

(中略)
さらに React コンポーネントとしてデフォルトで導入されている「MUI(旧 Material UI)」も限定されているわけではなく,他のライブラリを使うこともできる.しかし,Docker Extensions のドキュメントには「React x MUI 推奨」と書いてある.Docker Extensions デザインの一貫性 (look & feel) の観点や今後 MUI を拡張する予定もあるらしく,基本的には MUI を使うのが良さそう.
$ docker build -t kakakakakku/my-extension .

$ docker image ls kakakakakku/my-extension
REPOSITORY                 TAG       IMAGE ID       CREATED              SIZE
kakakakakku/my-extension   latest    ef80c4794f8b   About a minute ago   12.6MB
$ docker extension install kakakakakku/my-extension
Extensions can install binaries, invoke commands and access files on your machine.
Are you sure you want to continue? [y/N] y
Installing new extension "kakakakakku/my-extension"
Installing service in Desktop VM...
Setting additional compose attributes
VM service started
Installing Desktop extension UI for tab "My-Extension"...
Extension UI tab "My-Extension" added.
Extension "my-extension" installed successfully
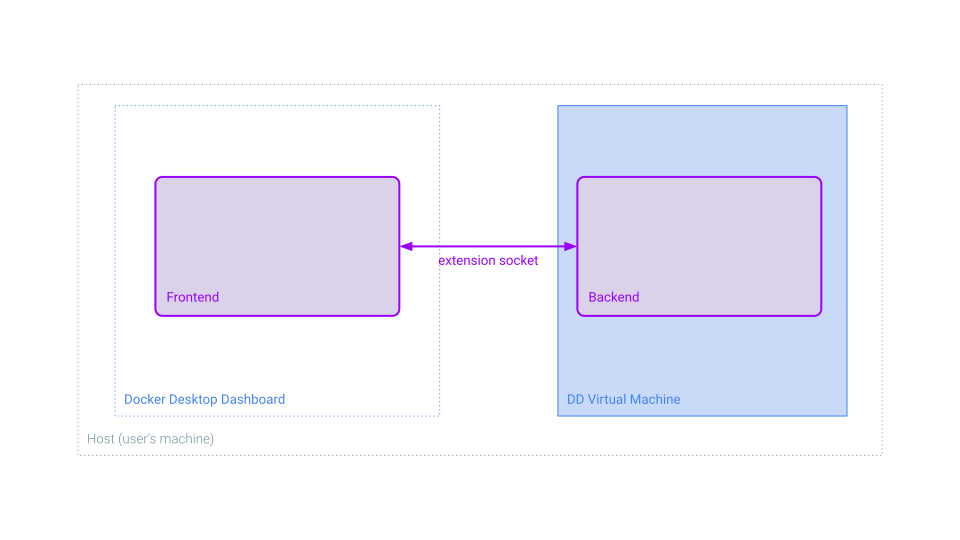
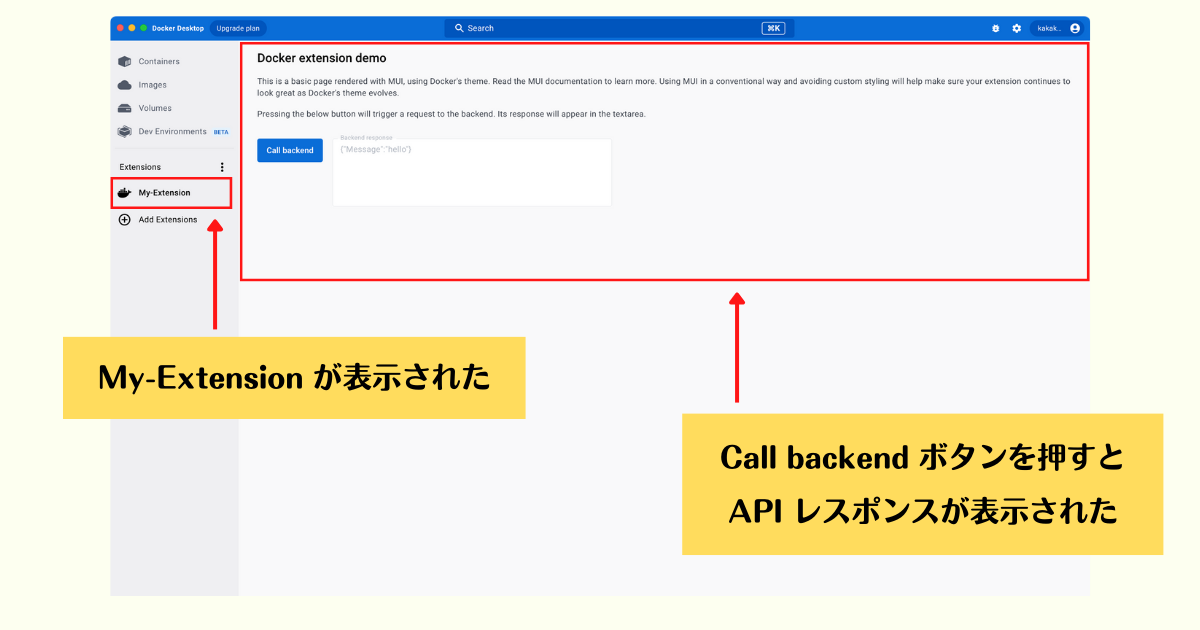
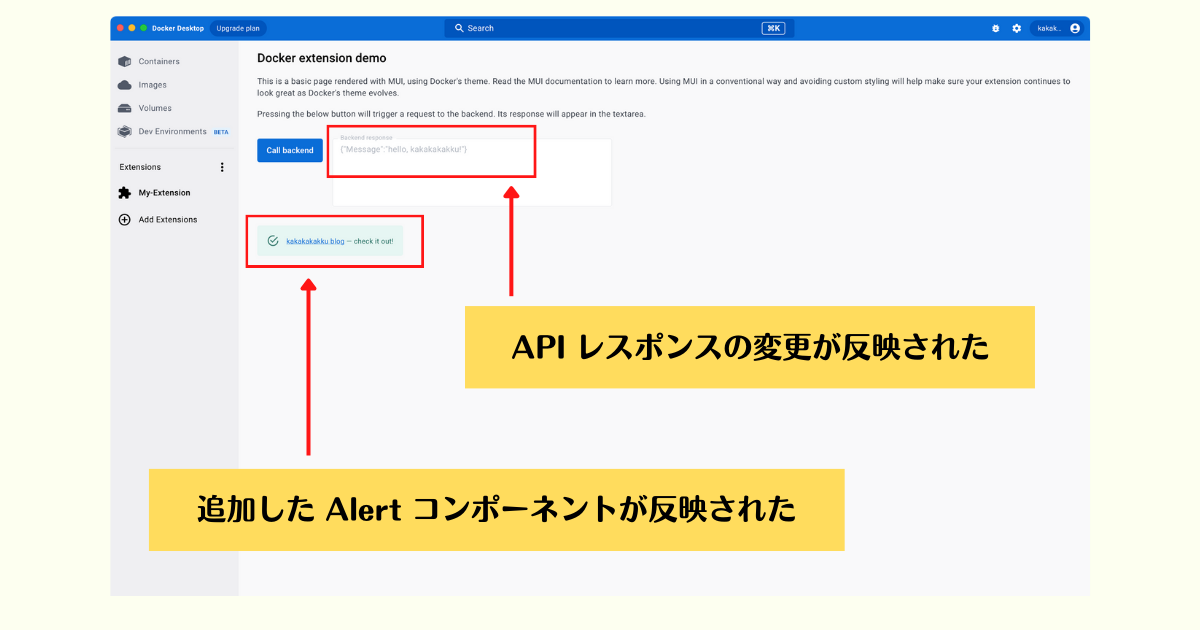
特にフロントエンド側の開発は試行錯誤を伴うため,毎回ビルドせずにコードを修正したらすぐに「ホットリロード」する仕組みがある(正確には Vite の Hot Module Replacement (HMR) を使っている).手順としては npm run dev コマンドを実行して http://localhost:3000 に UI アプリケーションを起動し,docker extension dev ui-source コマンドを実行して UI コンポーネントの参照先を localhost にする.あとはコードを修正するとほぼリアルタイムに Docker Desktop に反映されるため,開発体験が良くなる❗️詳しくはドキュメント参照〜
$ cd ui
$ npm run dev
$ docker extension dev ui-source kakakakakku/my-extension http://localhost:3000
UI sourcefor the extension "kakakakakku/my-extension" changed to "http://localhost:3000"%
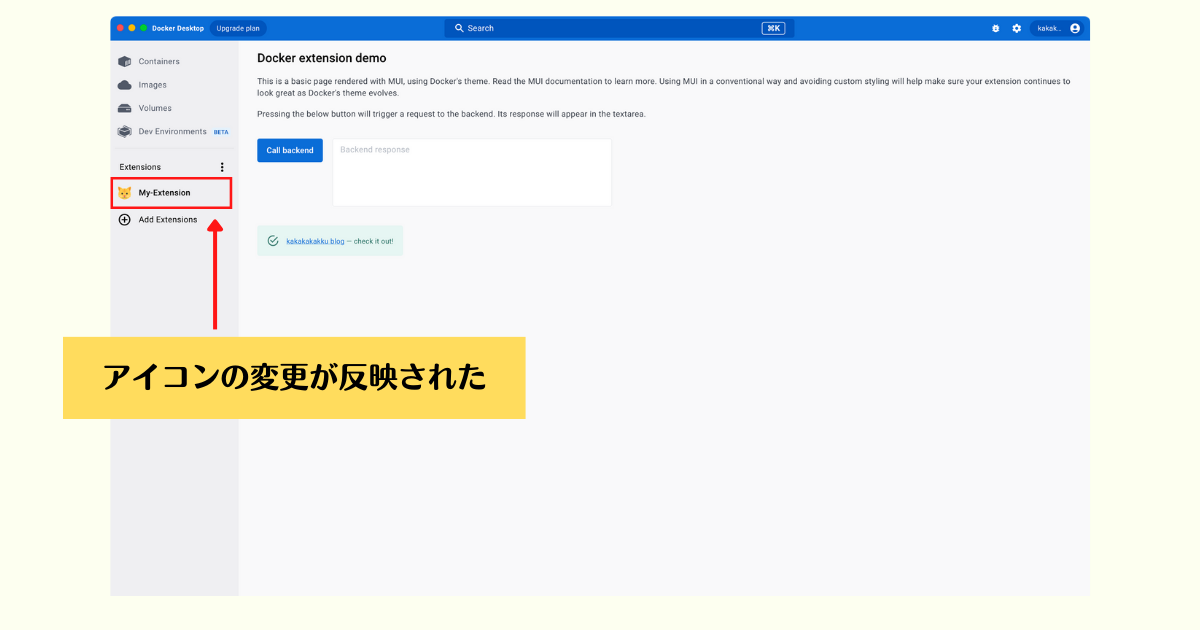
In the example Dockerfile, you can see that the image label com.docker.desktop.extension.icon is set to an icon URL. The Extensions Marketplace displays this icon without installing the extension. The Dockerfile also includes COPY docker.svg . to copy an icon file inside the image. This second icon file is used to display the extension UI in the Dashboard, once the extension is installed. Create an advanced frontend extension | Docker Documentation
$ make help
Please specify a build target. The choices are:
build-extension                Build service image to be deployed as a desktop extension
install-extension              Install the extension
update-extension               Update the extension
prepare-buildx                 Create buildx builder for multi-arch build, if not exists
push-extension                 Build & Upload extension image to hub. Do not push if tag already exists: make push-extension tag=0.1
help                           Show this help