Hasura のチュートリアルはとても充実していて,今まで GraphQL を学ぶ「GraphQL Tutorial」と Hasura を学ぶ「Hasura GraphQL Tutorial」を実施した \( 'ω')/ どちらもおすすめ💎
今回は Hasura とバックエンドアプリケーションを統合する機能(リモートスキーマ・アクション・イベント)を学べる「Backend Tutorial (Python)」 を実施してみたので紹介する.ただ内容としてはとても勉強になるんだけど,今までのチュートリアルと比較するととにかく手順が不足していて,ハマりどころも多かった😇 実施しながら工夫したところなどをまとめておく❗️
1. Create a Python GraphQL Server with Strawberry
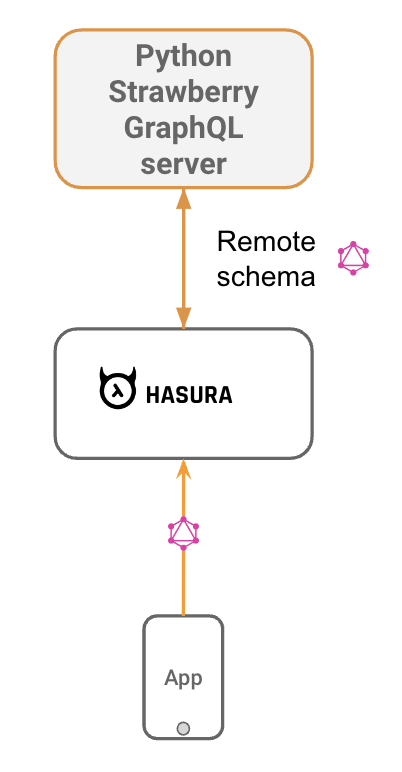
最初は Hasura の「リモートスキーマ」を使って,Hasura と外部の GraphQL API を統合する.構成は以下のようになる💡

GraphQL API としては Strawberry と FastAPI の組み合わせを使う.
ディレクトリ階層
手順ではディレクトリ階層の指定はなかったけど,以下のようにした.
1-remote-schemas
├── main.py
└── remoteSchema
    └── remoteSchema.py
main.py
main.py を手順の通り実装すると NameError: name 'app' is not defined というエラーになってしまう.Strawberry と FastAPI を組み合わせる必要があるため,以下のように書き換えた👌
from fastapi import FastAPI
from remoteSchema.remoteSchema import graphql_app, schema

app = FastAPI()
app.include_router(graphql_app, prefix="/graphql")
remoteSchema/remoteSchema.py
import strawberry

from strawberry.fastapi import GraphQLRouter


@strawberry.type
class Query:
    @strawberry.field
    def hello(self) -> str:
        return "Hello World"


schema = strawberry.Schema(Query)

graphql_app = GraphQLRouter(schema)
ngrok を活用する
実装して strawberry server main コマンドを実行すれば http://0.0.0.0:8000/graphql で GraphQL API を起動できるけど,今回は Hasura Cloud を使いたく,ngrok でローカル環境を一時的に公開してローカル環境に接続できるようにした.
$ strawberry server main
Running strawberry on http://0.0.0.0:8000/graphql 🍓

$ ngrok http http://localhost:8000
Session Status                online
Forwarding                    https://ea3b-240f-78-aa22-1-c8c6-ae74-fbdb-a19b.ngrok-free.app -> http://localhost:8000
Hasura Cloud でリモートスキーマを設定する
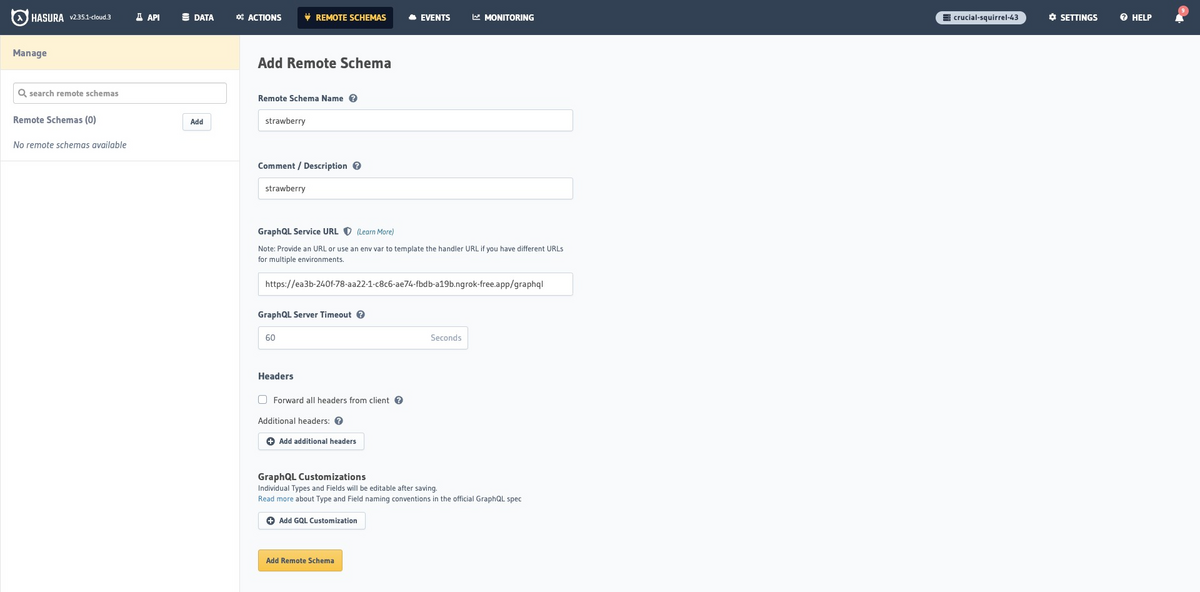
そして Hasura Cloud の「リモートスキーマ」を設定する.ポイントは GraphQL Service URL に ngrok のエンドポイント${NGROK}/graphql を指定するところ✔️ ちなみにスクリーンショットに載ってる Hasura プロジェクトは既に削除してるので GraphQL Endpoint には繋がらない✌️

最後にクエリを実行すると,リモートスキーマ経由で Hello World を取得できる❗️
{
  hello
}

2. Convert a Python REST API endpoint to GraphQL
次に Hasura の「アクション」を使って,Hasura と外部の RESTful API を統合する.構成は以下のようになる💡

RESTful API としては FastAPI を使う.
ディレクトリ階層
手順ではディレクトリ階層の指定はなかったけど,以下のようにした.
2-actions
├── action
│   ├── action.py
│   ├── login.py
│   └── loginTypes.py
└── main.py
main.py
main.py を手順の通り実装すると Import "event.event" could not be resolved など複数のエラーが出てしまう.また不要な import も残っていたりする.最終的に以下のように書き換えた👌
from fastapi import FastAPI
from typing import Generic, TypeVar
from pydantic import BaseModel
from pydantic.generics import GenericModel
from action.loginTypes import LoginResponse, loginArgs

ActionInput = TypeVar("ActionInput", bound=BaseModel | None)


class ActionName(BaseModel):
    name: str


class ActionPayload(GenericModel, Generic[ActionInput]):
    action: ActionName
    input: ActionInput
    request_query: str
    session_variables: dict[str, str]


app = FastAPI()


@app.post("/action")
async def actionHandler(action: ActionPayload[loginArgs]) -> LoginResponse:
    action.input
    return LoginResponse(AccessToken="<sample value>")
Hasura Cloud でアクションを設定する
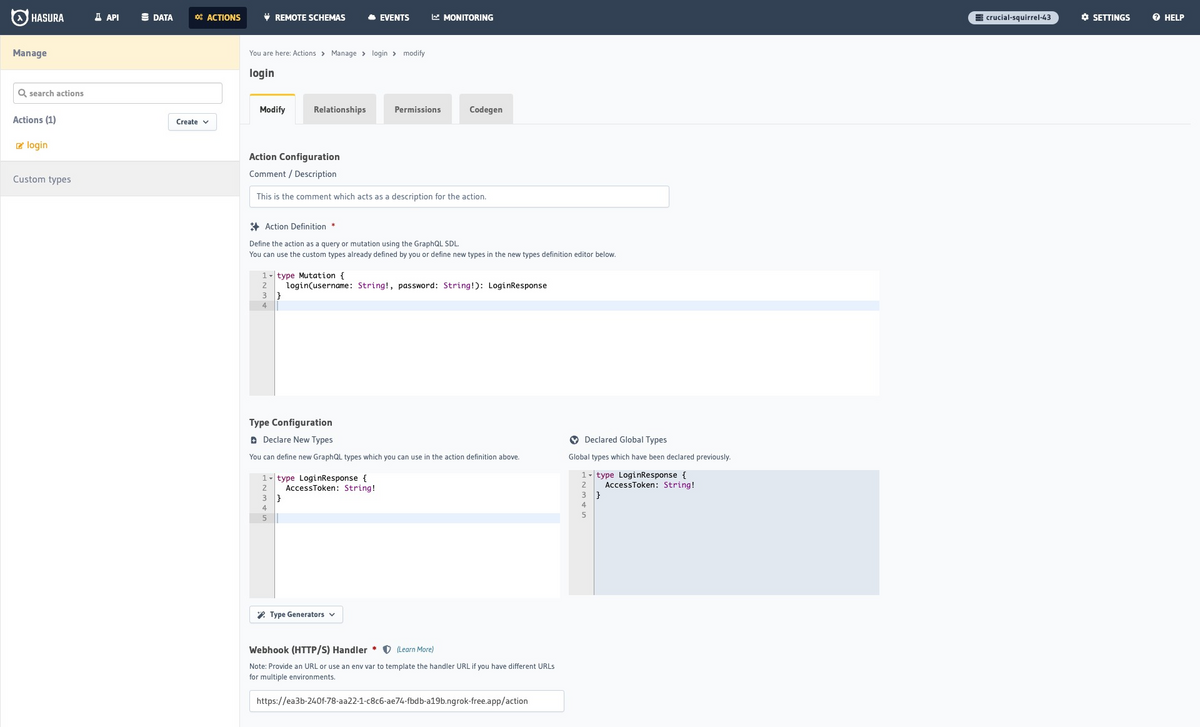
ちなみに action/login.py と action/loginTypes.py に関しては Hasura Cloud の「アクション」で「Codegen」を使って自動生成するため,まずは Hasura Cloud の「アクション」を設定する.ポイントは Webhook (HTTP/S) Handler に ngrok のエンドポイント${NGROK}/action を指定するところ✔️

そして「アクション」の「Codegen」から action/login.py と action/loginTypes.py をダウンロードしておく.

そうすると FastAPI で RESTful API を起動できるようになる.
$ uvicorn main:app --reload
INFO:     Uvicorn running on http://127.0.0.1:8000 (Press CTRL+C to quit)
INFO:     Application startup complete.
次にミューテーションを実行すると,アクション経由で <sample value> というレスポンスを取得できる❗️
mutation {
  login(password: "password", username: "username") {
    AccessToken
  }
}

3. Run async scheduled events using a Python REST API and Hasura GraphQL
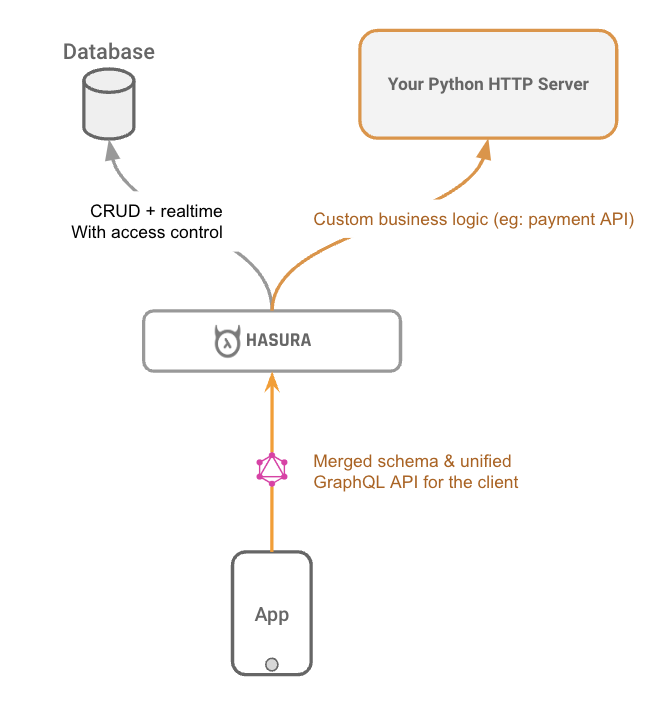
最後は Hasura の「イベント」を使って,データベースに変更があったことを検知して Hasura から外部の RESTful API を呼び出す.構成は以下のようになる💡

ディレクトリ階層
手順ではディレクトリ階層の指定はなかったけど,以下のようにした.
3-events
├── event
│   └── event.py
└── main.py
main.py
手順ではイベントを受け取ったら GraphQL クエリを実行する実装になっているけど,Hasura Cloud の GraphQL Endpoint とうまく接続できず,今回はイベント情報をそのままログに出力しようと思って,以下のように書き換えた👌
from fastapi import FastAPI
from pydantic import BaseModel
from event.event import Payload


app = FastAPI()


class UserTable(BaseModel):
    id: str
    name: str


@app.post("/event")
async def actionHandler(action: Payload[UserTable, None]):
    print(action)
    return
FastAPI の RESTful API を更新したらバックエンド側は準備 OK👌
$ uvicorn main:app --reload
INFO:     Uvicorn running on http://127.0.0.1:8000 (Press CTRL+C to quit)
INFO:     Application startup complete.
Hasura Cloud で PostgreSQL を設定する
今度は Hasura Cloud からイベントを受け取れるようにする.まず Hasura Cloud で Neon を使って PostgreSQL データベースを作る.さらに user テーブルを作っておく.カラムは id (UUID) と name (Text) の2つ.
Hasura Cloud でイベントを設定する
そして Hasura Cloud の「イベント」を設定する.ポイントは Webhook (HTTP/S) Handler に ngrok のエンドポイント${NGROK}/event を指定するところと Trigger Method に insert を指定するところ✔️

最後に Hasura Cloud から直接 PostgreSQL の user テーブルに kakakakakku ユーザーを追加する👱

すると,RESTful API のログに以下のように表示される👌new の値に UserTable(id='ff0f14e7-92f0-498d-8616-ff33d2d2d417', name='kakakakakku') と書いてあって,期待通りイベントを受け取れている❗️
created_at='2023-12-28T05:00:00.000000'
delivery_info=DeliveryInfo(current_retry=0, max_retries=0)
event=Event[UserTable, NoneType](
    data=Data[UserTable, NoneType](
        new=UserTable(id='ff0f14e7-92f0-498d-8616-ff33d2d2d417', name='kakakakakku'),
        old=None
    ),
    op='INSERT',
    session_variables={'x-hasura-role': 'admin'},
    trace_context=TraceContext(span_id='xxxxxxxxxxxxxxxx', trace_id='xxxxxxxxxxxxxxxxxxxxxxxxxxxxxxxx')
)
id='xxxxxxxx-xxxx-xxxx-xxxx-xxxxxxxxxxxx'
table=Table(name='user', schema_='public')
trigger=Trigger(name='user')
まとめ
Hasura とバックエンドアプリケーションを統合する機能(リモートスキーマ・アクション・イベント)を学べる「Backend Tutorial (Python)」 を実施した.ビジネスロジックを拡張する仕組みとして覚えておく❗️手順だけではうまく動かずハマりどころも多かったけど,ポイントをまとめたので参考になればなーと🙏 ちなみに今回は Hasura Cloud を使いつつ,バックエンドはローカル環境に実装したけど,Hasura も含めてローカル環境に構築する場合は GitHub に公開されてる backend-stack/source-code/python の docker-compose.yml も参考になる👏