kakakakakku blog

Weekly Tech Blog: Keep on Learning!

GitHub Actions と Playwright を組み合わせて Build Your Own Radar を継続的に構築しよう

「自分だけの Technology Radar」を構築できる「Build Your Own Radar」を以下の記事で紹介した💡

kakakakakku.hatenablog.com
Build Your Own Radar サービスに入力する Technology Radar ファイルとしては Google Sheets / CSV / JSON を使うことができて,もし Build Your Own Radar を企業やチームで構築するなら Technology Radar ファイルを「GitHub 管理」したくなると思う.

今回は検証として,GitHub に CSV ファイルをコミットしたら GitHub ActionsPlaywright for Python を組み合わせて「自動的に Technology Radar を構築する仕組み」を試してみた.構成はザッと以下のような感じで,最終的に Playwright for Python で Build Your Own Radar の "スクリーンショット" と "PDF" を取得して GitHub Actions のアーティファクトに保存する.

.github/workflows/byor.yaml

GitHub Actions のワークフローを以下のように構成した.

まず,1点目のポイントは GitHub Actions の「サービスコンテナ」を使っているところで,ワークフローの中に Build Your Own Radar コンテナを起動して http://localhost/ でアクセスできるようにしている.また CSV ファイルを読み込ませるために volumes を指定してホスト側をマウントしている.

docs.github.com

2点目のポイントは GitHub にコミットした CSV ファイルを sudo cp -p ${GITHUB_WORKSPACE}/files/* /files でマウントしたホスト側のディレクトリにコピーしているところ.検証中にハマったのは Build Your Own Radar コンテナを起動したときに実行される build_and_start_nginx.sh の中に cp /src/build-your-own-radar/spec/end_to_end_tests/resources/localfiles/* ./files/ と実装されていて,デフォルトの radar.csvradar.json がセットアップされることに気付かなかったこと.GitHub にコミットした CSV ファイルが反映されずに結構な時間を溶かした🌀

他は Playwright for Python を実行するために Python 環境をセットアップしたり,GitHub Actions のアーティファクトに "スクリーンショット" と "PDF" を保存したりしている❗️他は自由に変えてもらえればと〜

name: Build Your Own Radar (BYOR)

on:
  push:
    branches:
      - master

jobs:
  build:
    runs-on: ubuntu-latest
    services:
      byor:
        image: wwwthoughtworks/build-your-own-radar
        ports:
          - 80:80
        volumes:
          - /files/:/opt/build-your-own-radar/files
    steps:
      - uses: actions/checkout@v3
      - name: Set up Python
        uses: actions/setup-python@v4
        with:
          python-version: '3.10'
      - name: Install dependencies
        run: |
          pip install -r requirements.txt
      - name: Set up Playwright
        run: |
          playwright install
      - name: Wait for BYOR container running
        run: |
          # Wait for launching container
          sleep 60
          sudo cp -p ${GITHUB_WORKSPACE}/files/* /files
      - name: Build radar
        run: |
          python byor.py
      - name: Upload artifacts
        uses: actions/upload-artifact@v3
        with:
          name: byor-artifacts
          path: artifacts/
          retention-days: 90

GitHub Actions のワークフローから実行している Playwright for Python コードも以下に載せておく.もっとキレイに実装できる気もするけど,ポイントとしては "スクリーンショット" と "PDF" を取得しているところ.

byor.py

from playwright.sync_api import sync_playwright
from time import sleep

with sync_playwright() as p:
    browser = p.chromium.launch()
    page = browser.new_page()

    page.goto('http://localhost/')

    page.locator('input[name="sheetId"]').fill('http://localhost/files/radar.csv')
    page.locator('a.button').click()

    # Wait for "Your Technology Radar will be available in just a few seconds"
    page.wait_for_selector('div#radar')

    page.screenshot(path='artifacts/byor.png', full_page=True)
    page.pdf(path='artifacts/byor.pdf', format='A4')

    browser.close()

アーティファクト

GitHub Actions の実行が終わると GitHub Actions のアーティファクトに byor-artifacts.zip が保存される.その中に byor.pngbyor.pdf が含まれているので,継続的に Build Your Own Radar の履歴を残せるようになった❗️GitHub Actions の retention-days 設定には注意〜

まとめ

GitHub ActionsPlaywright for Python を組み合わせて「自動的に Technology Radar を構築する仕組み」を試してみた❗️

コードなどは GitHub リポジトリに公開しておいた〜

github.com

Build Your Own Radar で「自分だけの」Technology Radar を構築しよう

「Build Your Own Radar (BYOR)」を使うと Thoughtworks 社が毎年2回ほど出している Technology Radar と同じフォーマットで「自分だけの Technology Radar」を構築できる❗️

企業の技術戦略を策定してどんなテクノロジー組織を目指しているのかを可視化したり,チームでどんなテクノロジーを今後採用したいのかを可視化したりできる.チーム間で Build Your Own Radar を共有して情報交換をするのも良さそう.チームイベントやレトロスペクティブなどの場で Build Your Own Radar を構築してみるのはいかがでしょうか✌

\( 'ω')/ オレオレ Technology Radar を構築するぞー

www.thoughtworks.com

Thoughtworks 社の Technology Radar に関しては以下を見てもらえればと〜

  • Quadrants
    • Programming Languages and Frameworks
    • Tools
    • Platforms
    • Techniques
  • Rings
    • Adopt
    • Trial
    • Assess
    • Hold

www.thoughtworks.com

Build Your Own Radar を構築する

Build Your Own Radar (BYOR) を構築する方法は「大きく2つ」ある.

  1. ホスティングされた Build Your Own Radar サービスを使う
  2. Build Your Own Radar サービスをコンテナで起動する

www.thoughtworks.com

1. ホスティングされた Build Your Own Radar サービスを使う

最初に Technology Radar ファイルを作っておく.フォーマットは大きく以下の3種類から選べる.Google Sheets のサンプルとして ThoughtWorks Technology Radar Vol. 27 と Vol. 26 を載せておく.注意点としては Google Sheets を使う場合は Google 認証を求められることと,CSV / JSON の場合は GitHub などに置いて「公開設定」をしておく必要があること.

次に Build Your Own Radar に Technology Radar ファイルの URL を入力すれば OK❗️

おおおおお!スゴイ👏

2. Build Your Own Radar サービスをコンテナで起動する

今度は Docker を使って Build Your Own Radar サービスをコンテナで起動する.コンテナイメージは Docker Hub に公開されていて,すぐに試せる.macOS / Windows など「ローカル環境で」動かせるのはメリットだと思う❗️

Build Your Own Radar の実装は GitHub で確認できる.

github.com

もし Google Sheets を使うなら Google OAuth Client ID を取得しておく必要がある.今回は Google OAuth Client ID を取得せずお手軽に試せる CSV で試す.コンテナで起動する場合は CSV ファイルを公開しなくても使える.

まず ./files ディレクトリと ./files/radar.csv を作る(もちろん JSON でも OK👌).CSV ファイルは Google Sheets (Thoughtworks Technology Radar Vol. 27) からエクスポートした.そして docker run コマンドを実行して Build Your Own Radar コンテナを起動するときに ./files ディレクトリをマウントしておく.

$ mkdir files
$ touch files/radar.csv
$ docker run -p 8080:80 -v $(pwd)/files/:/opt/build-your-own-radar/files wwwthoughtworks/build-your-own-radar

そして http://localhost:8080/ を開くと Build Your Own Radar にアクセスできる❗️

おおおおお!スゴイ👏

Technology Radar ファイルの URL は http://localhost:8080/files/radar.csv のように localhost を参照できる.

まとめ

「Build Your Own Radar (BYOR)」を使って「自分だけの」Technology Radarを構築しよう❗️

Docker Desktop の Extensions を実装してみよう

2023年1月にリリースされた Docker Desktop v4.16.0 (release notes) で GA になった「Docker Extensions」の Extensions は段々と種類が増えてきて,Disk Usage / Aqua Trivy / LocalStack など,最近使う機会もあったりする.今回は "Quickstart" ドキュメントを読みながら Docker Extensions の実装に入門してみた❗️

\( 'ω')/ オレオレ Docker Extension を実装するぞー

docs.docker.com

🐳 docker extension コマンド

まず,Docker Extensions を実装するためには docker extension コマンドを使う.コマンド一覧を以下に載せておく.

$ docker extension --help

Usage:  docker extension [OPTIONS] COMMAND

Manages Docker extensions

Options:
      --socket string   The Desktop extension manager socket

Management Commands:
  dev             Extension development helpers

Commands:
  init            Create a new Docker Extension based on a template.
  install         Install a Docker extension with the specified image
  ls              List installed Docker extensions
  rm              Remove a Docker extension
  share           Generate a link to share the extension.
  update          Remove and re-install a Docker extension
  validate        Validate an extension image or metadata file
  version         Print the client and server versions

Run 'docker extension COMMAND --help' for more information on a command.

$ docker extension dev --help

Usage:  docker extension dev COMMAND

Extension development helpers

Commands:
  debug       Set the debug mode for an extension
  reset       Reset the source and disables the debug mode for the extension UI
  ui-source   Set a new source for the extension UI

Run 'docker extension dev COMMAND --help' for more information on a command.

🐳 検証環境

今回は Docker Desktop for Mac v4.16.2 と,以下の Docker Extensions を検証環境として使う.

$ docker extension version
Client Version: v0.2.17
Server API Version: 0.3.3

🐳 docker extension init コマンド

まず docker extension init コマンドを実行すると Docker Extensions のプロジェクトを簡単にセットアップできる.Quickstart に沿って,今回は my-extension という名前にする.初期化中のログを見ると Go backendReact app など,馴染みのある技術スタックが使われていることがわかる❗️

$ docker extension init my-extension
? Title: my-extension
? Description: my-extension
? Vendor: kakakakakku
? Image Repository where the extension will be pushed: kakakakakku/my-extension

(中略)

Creating a Go backend service...
Initializing new go module...
Creating a React app...
Copying ui dir...
Renaming some files...
Installing npm packages, this may take a few minutes...

(中略)

プロジェクトディレクトリは以下のようになる(tree コマンドで2階層目まで表示している).

$ tree -L 2 .
.
├── Dockerfile
├── Makefile
├── README.md
├── backend
│   ├── go.mod
│   ├── go.sum
│   └── main.go
├── docker-compose.yaml
├── docker.svg
├── metadata.json
└── ui
    ├── index.html
    ├── node_modules
    ├── package-lock.json
    ├── package.json
    ├── public
    ├── src
    ├── tsconfig.json
    ├── tsconfig.node.json
    └── vite.config.ts

6 directories, 15 files

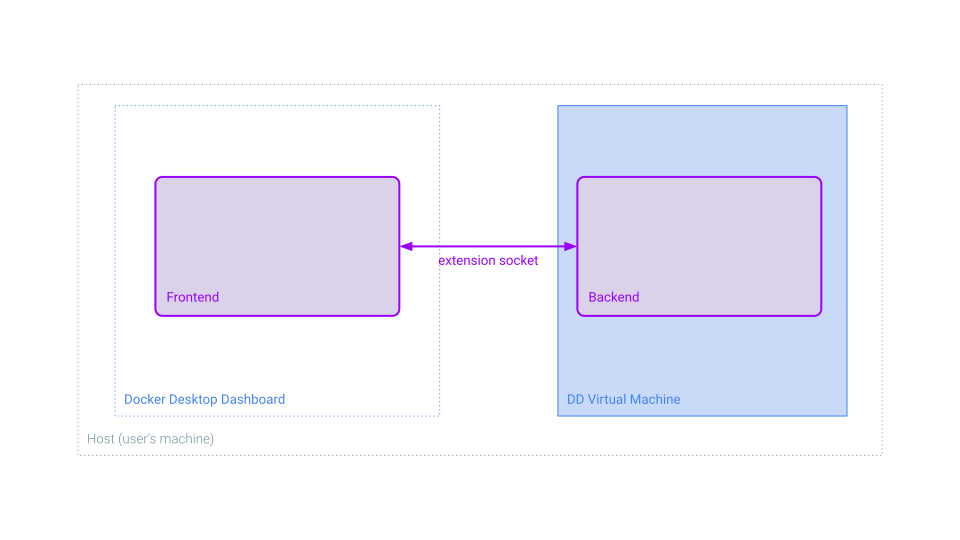
Docker Extensions を実装する前に「構成」を理解しておく必要がある.Docker Extensions は,重要な2つのコンポーネント「UI (例: React x TypeScript x MUI)」「Backend (例: Go)」を組み合わせて実装する❗️以下に UI (Frontend) と Backend の関係性がまとまった図をドキュメントから引用して載せておく.

Extension architecture | Docker Documentation より引用

ちなみに「UI」は React に限定されているわけではなく Vue / Anguler なども使える.「Backend」も Go に限定されているわけではなく Node.js / Python なども使える.よって,Docker Extensions を実装する技術スタックとしては「自由度がある」とも言える.詳しくはドキュメント参照〜

docs.docker.com

さらに React コンポーネントとしてデフォルトで導入されている「MUI(旧 Material UI)」も限定されているわけではなく,他のライブラリを使うこともできる.しかし,Docker Extensions のドキュメントには「React x MUI 推奨」と書いてある.Docker Extensions デザインの一貫性 (look & feel) の観点や今後 MUI を拡張する予定もあるらしく,基本的には MUI を使うのが良さそう.

mui.com

docs.docker.com

🐳 Dockerfile

次に Dockerfile を確認する.初期化したときに作られた Dockerfile は以下のようになっていた.ポイントは Multi-stage builds を使って Backend (Go) と UI (React) をビルドして,最終的に Alpine イメージにまとめているところ.

FROM golang:1.19-alpine AS builder
ENV CGO_ENABLED=0
WORKDIR /backend
COPY backend/go.* .
RUN --mount=type=cache,target=/go/pkg/mod \
    --mount=type=cache,target=/root/.cache/go-build \
    go mod download
COPY backend/. .
RUN --mount=type=cache,target=/go/pkg/mod \
    --mount=type=cache,target=/root/.cache/go-build \
    go build -trimpath -ldflags="-s -w" -o bin/service

FROM --platform=$BUILDPLATFORM node:18.12-alpine3.16 AS client-builder
WORKDIR /ui
# cache packages in layer
COPY ui/package.json /ui/package.json
COPY ui/package-lock.json /ui/package-lock.json
RUN --mount=type=cache,target=/usr/src/app/.npm \
    npm set cache /usr/src/app/.npm && \
    npm ci
# install
COPY ui /ui
RUN npm run build

FROM alpine
LABEL org.opencontainers.image.title="my-extension" \
    org.opencontainers.image.description="my-extension" \
    org.opencontainers.image.vendor="kakakakakku" \
    com.docker.desktop.extension.api.version="0.3.3" \
    com.docker.extension.screenshots="" \
    com.docker.extension.detailed-description="" \
    com.docker.extension.publisher-url="" \
    com.docker.extension.additional-urls="" \
    com.docker.extension.changelog=""

COPY --from=builder /backend/bin/service /
COPY docker-compose.yaml .
COPY metadata.json .
COPY docker.svg .
COPY --from=client-builder /ui/build ui
CMD /service -socket /run/guest-services/backend.sock

🐳 コンテナイメージをビルドする

手順に戻る!今度は docker build コマンドを実行して Dockerfile からコンテナイメージをビルドする.Multi-stage builds を使っているので,最終的に 12.6MB とサイズも小さく抑えられている.

$ docker build -t kakakakakku/my-extension .

$ docker image ls kakakakakku/my-extension
REPOSITORY                 TAG       IMAGE ID       CREATED              SIZE
kakakakakku/my-extension   latest    ef80c4794f8b   About a minute ago   12.6MB

🐳 docker extension install コマンド

最後は docker extension install コマンドを実行して Docker Extensions を Docker Desktop にインストールすれば完了〜

$ docker extension install kakakakakku/my-extension
Extensions can install binaries, invoke commands and access files on your machine.
Are you sure you want to continue? [y/N] y
Installing new extension "kakakakakku/my-extension"
Installing service in Desktop VM...
Setting additional compose attributes
VM service started
Installing Desktop extension UI for tab "My-Extension"...
Extension UI tab "My-Extension" added.
Extension "my-extension" installed successfully

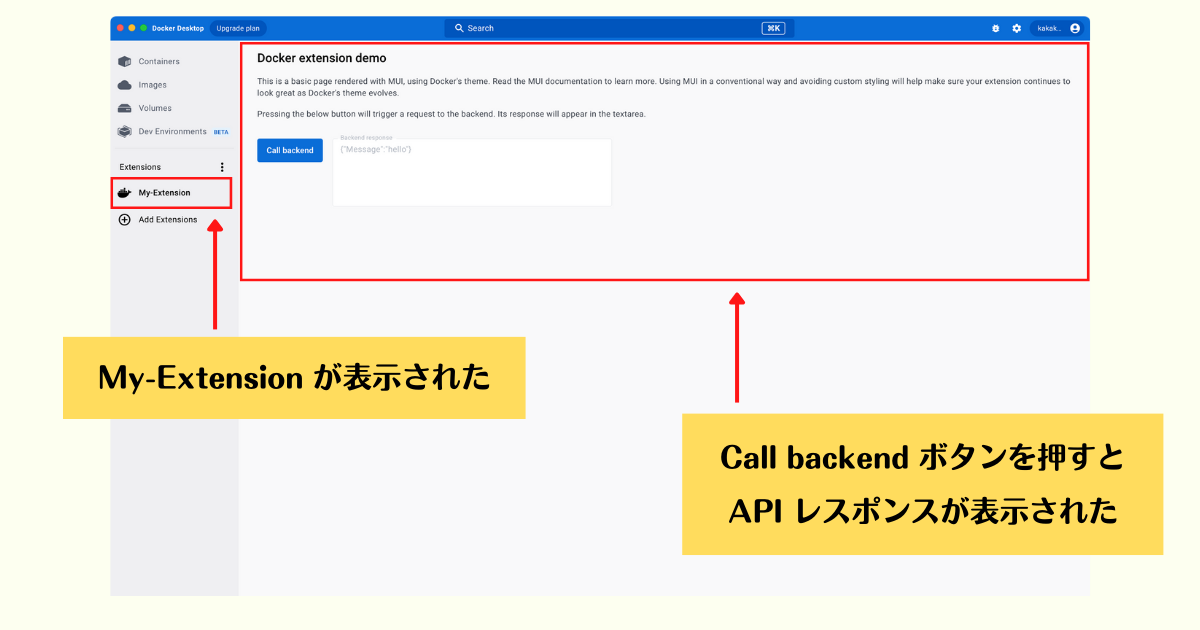
Docker Desktop に my-extension が表示されたぁぁぁぁぁ❗️

🐳 docker extension update コマンド

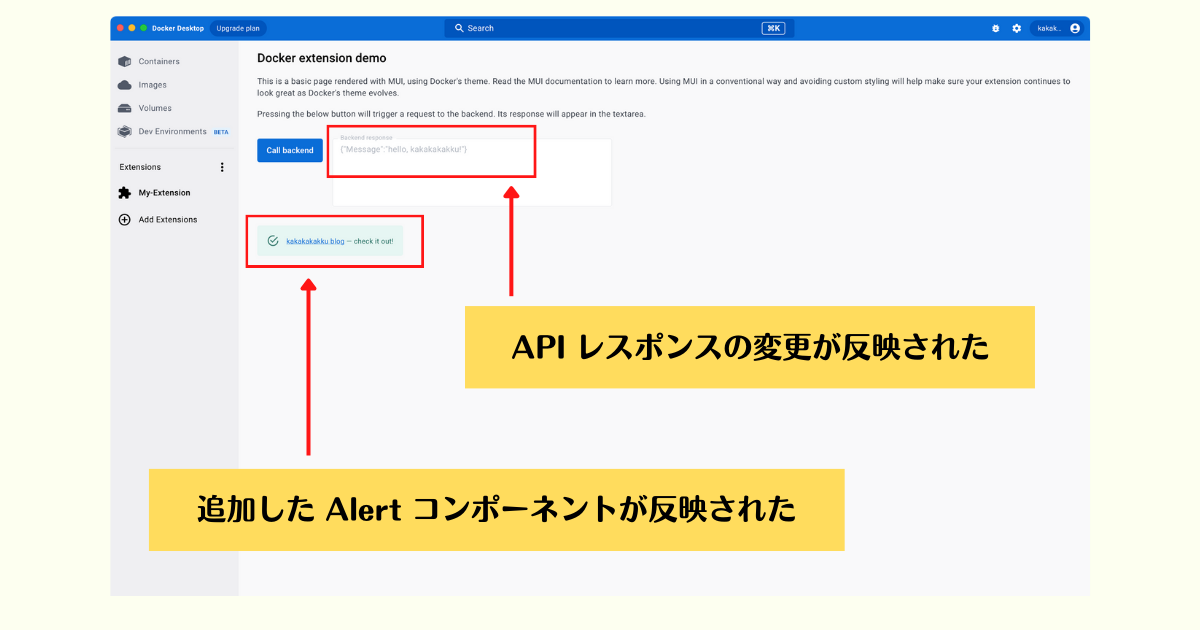
次に UI (React) と Backend (Go) それぞれのコードを修正して,Docker Extensions に更新を反映する.もう一度 docker build コマンドを実行して,今度は docker extension update コマンドを実行する.すると Docker Extensions に更新が反映されたぁぁぁぁぁ❗️

$ docker build -t kakakakakku/my-extension .
$ docker extension update kakakakakku/my-extension

🐳 ホットリロード

特にフロントエンド側の開発は試行錯誤を伴うため,毎回ビルドせずにコードを修正したらすぐに「ホットリロード」する仕組みがある(正確には ViteHot Module Replacement (HMR) を使っている).手順としては npm run dev コマンドを実行して http://localhost:3000 に UI アプリケーションを起動し,docker extension dev ui-source コマンドを実行して UI コンポーネントの参照先を localhost にする.あとはコードを修正するとほぼリアルタイムに Docker Desktop に反映されるため,開発体験が良くなる❗️詳しくはドキュメント参照〜

$ cd ui
$ npm run dev
$ docker extension dev ui-source kakakakakku/my-extension http://localhost:3000
UI source for the extension "kakakakakku/my-extension" changed to "http://localhost:3000"%

docs.docker.com

🐳 アイコンを変更する

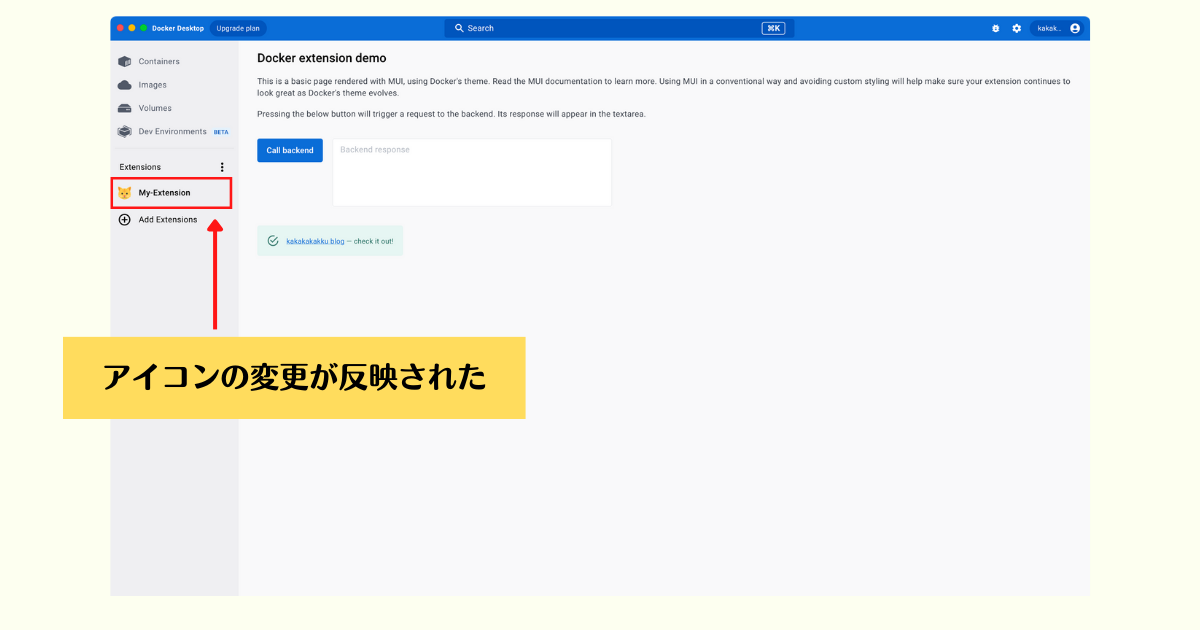
Docker Desktop の Extensions 一覧に表示されるアイコンは初期化したプロジェクトに含まれている docker.svg で,metadata.json で設定する仕組みになっている.

{
  "icon": "docker.svg",
  "vm": {
    "composefile": "docker-compose.yaml",
    "exposes": {
      "socket": "backend.sock"
    }
  },
  "ui": {
    "dashboard-tab": {
      "title": "My-Extension",
      "src": "index.html",
      "root": "ui",
      "backend": {
        "socket": "backend.sock"
      }
    }
  }
}

さらに docker.svgDockerfileCOPY docker.svg . を実行してコンテナイメージに含まれている.metadata.jsonDockerfile を修正すると Docker Extensions のアイコンを変更できる.

ちなみに Dockerfile に記述できる LABELcom.docker.desktop.extension.icon もあって混乱するけど,LABEL は Docker Extensions を Extensions Marketplace に公開するときに使われる.二重に設定してるように感じてややこしく感じたけど,仕様である旨はドキュメントに書いてあった.

In the example Dockerfile, you can see that the image label com.docker.desktop.extension.icon is set to an icon URL. The Extensions Marketplace displays this icon without installing the extension. The Dockerfile also includes COPY docker.svg . to copy an icon file inside the image. This second icon file is used to display the extension UI in the Dashboard, once the extension is installed.
Create an advanced frontend extension | Docker Documentation

docs.docker.com

🐳 Extensions Marketplace に公開する

Docker Extensions の実装と動作確認が終わったら Extensions Marketplace に公開できる.今回は "Quickstart" を試しただけなので割愛する.公開するプロセスは以下のドキュメントに詳しく載っている.

docs.docker.com

🐳 Makefile

今回は docker extension コマンドを実行したけど,初期化したプロジェクトには Makefile も含まれている.よって,make build-extensionmake install-extension など,簡単に実行することもできる❗️

$ make help
Please specify a build target. The choices are:
build-extension                Build service image to be deployed as a desktop extension
install-extension              Install the extension
update-extension               Update the extension
prepare-buildx                 Create buildx builder for multi-arch build, if not exists
push-extension                 Build & Upload extension image to hub. Do not push if tag already exists: make push-extension tag=0.1
help                           Show this help

🐳 まとめ

今回は Docker Extensions の "Quickstart" ドキュメントを読みながら,Hello World レベルではあるけど「オレオレ Docker Extension」を実装してみた❗️実装の流れを把握できて良かった.次はもっと実用的な Docker Extension を実装してみたいぞ〜

本棚に眠っていた「一生モノの英語勉強法」を読み直した

いつ購入したのか正確には覚えていないけど,本棚に眠っていた「一生モノの英語勉強法」を読み直した📖

本書では「実践しやすい英語学習のコツ」が紹介されていて,自分自身にあった勉強法を見つけるのに使える一冊だった.関連書籍や学習リソースが多く紹介されているのも良かった.受験のために問題集をどう使うかというコツも載っていた.2013年に出版されているので,少し古くなっている書籍などは一部あるけど,それでも気になる書籍も見つかった.最近は英語学習の書籍をいくつか読んでいて,どの書籍にも似たようなことが載っているけど,本書は「理論と感覚」のバランスが良いと思った.

目次

  • 第1章 : 英語ができれば人生が変わる!
  • 第2章 : “武器”としての発音
  • 第3章 : 本当は「おもしろい」英文法
  • 第4章 : 英文を読む―「多読」と「精読」の訓練法
  • 第5章 : 単語力アップの秘訣―英語学習で最大の難関を突破するには
  • 第6章 : 聞く技術と話す技術
  • 第7章 : 英語学習を継続するために
  • 第8章 : 英語学習のための必須グッズ一〇選

読み直した感想

本書のサブタイトルに 「理系的」学習システムのすすめ と書いてある通り,英文法や読解を理論的に紹介しているところもあるけど,それでも「理屈と暗記のバランスが重要」と書かれていて納得感があった.当然ながら理系じゃなくても読めるし,そこは気にしなくて良いと思う.

また理系的な(科学的な)トピックを扱っていて英語学習にも使えるサイトとして Scientific AmericanScienceNature も紹介されていた.実際にサイトを見てみたけど,特に Scientific American「The 60-Second Podcast」は短くまとまってて,文字起こしもあってシャドーイングにも使えそうだった.シャドーイング候補に追加しておいた❗️

www.scientificamerican.com

www.science.org

www.nature.com

他にも参考になったコツがあった💡2022年8月頃から毎日欠かさずに「シャドーイング(ディクテーション・音読・オーバーラッピングも含む)」を続けているけど(詳しくはこちら!),最近は思ったほど上達を感じられなくなっていた.例えば以下など,今すぐ試せそうなコツに出会えたのは良かった❗️

  • 音読筆写をする(1文を音読したら瞬間的に覚えて書き出す訓練)
  • 目の前のネイティブスピーカーに読み聞かせているつもりで音読をする
  • 音読をするときは構造上おかしな箇所で区切らない
  • リード・アンド・ルックアップをする(1文を黙読したら瞬間的に覚えて音読をする訓練)

また単語(ボキャビル)に関しても伸びてる実感がなくモチベーションが下がっていて,どうしても正確的に完璧主義になってしまうけど,改めてマインドセットを見直す❗️

  • あまり欲張らない
  • 実際に出会った単語を覚える
  • 完璧を求めない

他には "基本単語1500語" で必要最低限のコミュニケーションを取る「Globish(グロービッシュ)」という英語術が紹介されていたのも興味を持った.

ja.wikipedia.org

気になった書籍

本書では多くの関連書籍が紹介されていて,実際に本棚に眠っているものもあって読み直そうと思った.他に気になった書籍も載せておく.順番に読んでいこう📖

act: GitHub Actions のワークフローをローカル環境で実行する

GitHub Actions でワークフローを実行するときに git commitgit push を実行して GitHub Actions の実行を待つことがよくある.より迅速に実行して,結果を受け取るために「act」を使って GitHub Actions をローカル環境(コンテナ)で実行する仕組みを試してみた.便利だったので紹介しようと思う❗️

当然ながら GitHub Actions を完全再現できてるわけではなく,最終的には GitHub Actions を使うことにはなるけど,特に開発中に頻繁にテストを実行できるのはメリットだと思う.うまく併用しながら開発体験を高めよう👌

github.com

セットアップ

macOS の場合は Homebrew を使って簡単にセットアップできる.他には Chocolatey (Windows)Bash script も選べる.今回は act 0.2.40Docker Desktop 4.16.1 を使う.

$ brew install act

$ act --version
act version 0.2.40

act コマンドには多くのオプションがある.以下に載せておく.

$ act --help
Run GitHub actions locally by specifying the event name (e.g. `push`) or an action name directly.

Usage:
  act [event name to run] [flags]

If no event name passed, will default to "on: push"
If actions handles only one event it will be used as default instead of "on: push"

Flags:
  -a, --actor string                                      user that triggered the event (default "nektos/act")
      --artifact-server-addr string                       Defines the address to which the artifact server binds. (default "10.0.0.6")
      --artifact-server-path string                       Defines the path where the artifact server stores uploads and retrieves downloads from. If not specified the artifact server will not start.
      --artifact-server-port string                       Defines the port where the artifact server listens. (default "34567")
  -b, --bind                                              bind working directory to container, rather than copy
      --bug-report                                        Display system information for bug report
      --container-architecture string                     Architecture which should be used to run containers, e.g.: linux/amd64. If not specified, will use host default architecture. Requires Docker server API Version 1.41+. Ignored on earlier Docker server platforms.
      --container-cap-add stringArray                     kernel capabilities to add to the workflow containers (e.g. --container-cap-add SYS_PTRACE)
      --container-cap-drop stringArray                    kernel capabilities to remove from the workflow containers (e.g. --container-cap-drop SYS_PTRACE)
      --container-daemon-socket string                    Path to Docker daemon socket which will be mounted to containers (default "/var/run/docker.sock")
      --container-options string                          Custom docker container options for the job container without an options property in the job definition
      --defaultbranch string                              the name of the main branch
      --detect-event                                      Use first event type from workflow as event that triggered the workflow
  -C, --directory string                                  working directory (default ".")
  -n, --dryrun                                            dryrun mode
      --env stringArray                                   env to make available to actions with optional value (e.g. --env myenv=foo or --env myenv)
      --env-file string                                   environment file to read and use as env in the containers (default ".env")
  -e, --eventpath string                                  path to event JSON file
      --github-instance string                            GitHub instance to use. Don't use this if you are not using GitHub Enterprise Server. (default "github.com")
  -g, --graph                                             draw workflows
  -h, --help                                              help for act
      --input stringArray                                 action input to make available to actions (e.g. --input myinput=foo)
      --input-file string                                 input file to read and use as action input (default ".input")
      --insecure-secrets                                  NOT RECOMMENDED! Doesn't hide secrets while printing logs.
  -j, --job string                                        run a specific job ID
      --json                                              Output logs in json format
  -l, --list                                              list workflows
      --no-recurse                                        Flag to disable running workflows from subdirectories of specified path in '--workflows'/'-W' flag
      --no-skip-checkout                                  Do not skip actions/checkout
  -P, --platform stringArray                              custom image to use per platform (e.g. -P ubuntu-18.04=nektos/act-environments-ubuntu:18.04)
      --privileged                                        use privileged mode
  -p, --pull                                              pull docker image(s) even if already present
  -q, --quiet                                             disable logging of output from steps
      --rebuild                                           rebuild local action docker image(s) even if already present
      --remote-name string                                git remote name that will be used to retrieve url of git repo (default "origin")
      --replace-ghe-action-token-with-github-com string   If you are using replace-ghe-action-with-github-com  and you want to use private actions on GitHub, you have to set personal access token
      --replace-ghe-action-with-github-com stringArray    If you are using GitHub Enterprise Server and allow specified actions from GitHub (github.com), you can set actions on this. (e.g. --replace-ghe-action-with-github-com =github/super-linter)
  -r, --reuse                                             don't remove container(s) on successfully completed workflow(s) to maintain state between runs
      --rm                                                automatically remove container(s)/volume(s) after a workflow(s) failure
  -s, --secret stringArray                                secret to make available to actions with optional value (e.g. -s mysecret=foo or -s mysecret)
      --secret-file string                                file with list of secrets to read from (e.g. --secret-file .secrets) (default ".secrets")
      --use-gitignore                                     Controls whether paths specified in .gitignore should be copied into container (default true)
      --userns string                                     user namespace to use
  -v, --verbose                                           verbose output
      --version                                           version for act
  -w, --watch                                             watch the contents of the local repo and run when files change
  -W, --workflows string                                  path to workflow file(s) (default "./.github/workflows/")

今回使うサンプルワークフロー

今回はサンプルとして,Python で実装した FizzBuzz コードに対して Flake8pytest を実行するワークフローを使う.GitHub Actions の「Starter Workflows」として公開されている python-package.yml をベースに .github/workflows/test.yaml を用意した.

name: Python package

on:
  push:
    - master
  pull_request:
    - master

jobs:
  build:

    runs-on: ubuntu-latest
    strategy:
      fail-fast: false
      matrix:
        python-version: ['3.8', '3.9', '3.10']

    steps:
    - uses: actions/checkout@v3
    - name: Set up Python ${{ matrix.python-version }}
      uses: actions/setup-python@v3
      with:
        python-version: ${{ matrix.python-version }}
    - name: Install dependencies
      run: |
        python -m pip install --upgrade pip
        python -m pip install flake8 pytest
        if [ -f requirements.txt ]; then pip install -r requirements.txt; fi
    - name: Lint with flake8
      run: |
        flake8 . --count --select=E9,F63,F7,F82 --show-source --statistics
        flake8 . --count --exit-zero --max-complexity=10 --max-line-length=127 --statistics
    - name: Test with pytest
      run: |
        pytest

github.com

act コマンドを試す

さっそく act コマンドを試していく❗️

act --list コマンド

act --list コマンドを実行するとワークフロー一覧を確認できる.

$ act --list
Stage  Job ID  Job name  Workflow name   Workflow file  Events
0      build   build     Python package  test.yaml      push,pull_request

act コマンド(初回実行)

act コマンドを実行するとワークフローを実行できる.初回実行の場合は実行時に使う Docker Image を Large / Medium / Micro から選ぶ.今回は Medium を選んだ.すると,自動的に ~/.actrc という設定ファイルが作られて,デフォルト設定として使えるようになる..actrc をリポジトリごとに作って設定を上書きすることもできる.

$ act
? Please choose the default image you want to use with act:

  - Large size image: +20GB Docker image, includes almost all tools used on GitHub Actions (IMPORTANT: currently only ubuntu-18.04 platform is available)
  - Medium size image: ~500MB, includes only necessary tools to bootstrap actions and aims to be compatible with all actions
  - Micro size image: <200MB, contains only NodeJS required to bootstrap actions, doesn't work with all actions

参考までに Large / Medium / Micro それぞれを選んだときに自動的に作られた ~/.actrc の設定ファイルを以下に載せておく.

Micro

-P ubuntu-latest=node:16-buster-slim
-P ubuntu-22.04=node:16-bullseye-slim
-P ubuntu-20.04=node:16-buster-slim
-P ubuntu-18.04=node:16-buster-slim

Medium

-P ubuntu-latest=catthehacker/ubuntu:act-latest
-P ubuntu-22.04=catthehacker/ubuntu:act-22.04
-P ubuntu-20.04=catthehacker/ubuntu:act-20.04
-P ubuntu-18.04=catthehacker/ubuntu:act-18.04

Large

-P ubuntu-latest=catthehacker/ubuntu:full-latest
-P ubuntu-latest=catthehacker/ubuntu:full-20.04
-P ubuntu-18.04=catthehacker/ubuntu:full-18.04

なお,act 0.2.40 までは Micro を選んだときに作られる設定ファイルが間違っていて,以下のプルリクエストを出して直しておいた.既にリリースされている act 0.2.41 で直っている✌️

github.com

今回のワークフローでは runs-on: ubuntu-latest と設定しているため,Medium だと catthehacker/ubuntu:act-latest イメージを使ってワークフローが実行される.現時点だと ubuntu-latestubuntu-22.04 を参照しているため,明示的に -P ubuntu-latest=catthehacker/ubuntu:act-22.04 と設定しておくのも良いかと〜

github.com

act コマンド

改めて act コマンドを実行するとワークフローを実行できる.今回は matrix を使って Python 3.8 / 3.9 / 3.10 を並列実行するため,実行ログには以下の3種類が混在する(見にくいため順番は入れ替えて載せている).また pip install の実行ログや pytest 実行ログも表示されるため,標準出力は非常に多くなってしまう💦

  • build-1: Python 3.8
  • build-2: Python 3.9
  • build-3: Python 3.10
$ act

(中略)

[Python package/build-1] 🧪  Matrix: map[python-version:3.8]
[Python package/build-2] 🧪  Matrix: map[python-version:3.9]
[Python package/build-3] 🧪  Matrix: map[python-version:3.10]
[Python package/build-1]   ✅  Success - Main actions/checkout@v3
[Python package/build-2]   ✅  Success - Main actions/checkout@v3
[Python package/build-3]   ✅  Success - Main actions/checkout@v3
[Python package/build-1]   ✅  Success - Main Set up Python 3.8
[Python package/build-2]   ✅  Success - Main Set up Python 3.9
[Python package/build-3]   ✅  Success - Main Set up Python 3.10
[Python package/build-1]   ✅  Success - Main Install dependencies
[Python package/build-2]   ✅  Success - Main Install dependencies
[Python package/build-3]   ✅  Success - Main Install dependencies
[Python package/build-1]   ✅  Success - Main Lint with flake8
[Python package/build-2]   ✅  Success - Main Lint with flake8
[Python package/build-3]   ✅  Success - Main Lint with flake8
[Python package/build-1]   ✅  Success - Main Test with pytest
[Python package/build-2]   ✅  Success - Main Test with pytest
[Python package/build-3]   ✅  Success - Main Test with pytest
[Python package/build-1]   ✅  Success - Post Set up Python 3.8
[Python package/build-2]   ✅  Success - Post Set up Python 3.9
[Python package/build-3]   ✅  Success - Post Set up Python 3.10
[Python package/build-1] 🏁  Job succeeded
[Python package/build-2] 🏁  Job succeeded
[Python package/build-3] 🏁  Job succeeded

act --quiet コマンド

標準出力を "多少" 減らすときは --quiet オプションを組み合わせて使う.pip install の実行ログや pytest 実行ログを非表示にできる.それでもまだ多いけど〜

$ act --quiet

(中略)

[Python package/build-1] 🧪  Matrix: map[python-version:3.8]
[Python package/build-2] 🧪  Matrix: map[python-version:3.9]
[Python package/build-3] 🧪  Matrix: map[python-version:3.10]
[Python package/build-1]   ✅  Success - Main actions/checkout@v3
[Python package/build-2]   ✅  Success - Main actions/checkout@v3
[Python package/build-3]   ✅  Success - Main actions/checkout@v3
[Python package/build-1]   ✅  Success - Main Set up Python 3.8
[Python package/build-2]   ✅  Success - Main Set up Python 3.9
[Python package/build-3]   ✅  Success - Main Set up Python 3.10
[Python package/build-1]   ✅  Success - Main Install dependencies
[Python package/build-2]   ✅  Success - Main Install dependencies
[Python package/build-3]   ✅  Success - Main Install dependencies
[Python package/build-1]   ✅  Success - Main Lint with flake8
[Python package/build-2]   ✅  Success - Main Lint with flake8
[Python package/build-3]   ✅  Success - Main Lint with flake8
[Python package/build-1]   ✅  Success - Main Test with pytest
[Python package/build-2]   ✅  Success - Main Test with pytest
[Python package/build-3]   ✅  Success - Main Test with pytest
[Python package/build-1]   ✅  Success - Post Set up Python 3.8
[Python package/build-2]   ✅  Success - Post Set up Python 3.9
[Python package/build-3]   ✅  Success - Post Set up Python 3.10
[Python package/build-1] 🏁  Job succeeded
[Python package/build-2] 🏁  Job succeeded
[Python package/build-3] 🏁  Job succeeded

act --reuse コマンド

ワークフロー実行時に構築するイメージを再利用する場合は --reuse オプションを組み合わせて使う.実行時間は多少早くなる.

$ act --reuse

act --watch コマンド

--watch オプションを使うとコードやワークフロー設定の変更を検知して,自動的にワークフローを再実行できる.ただし,実際に試してみると,1度テストが落ちると再実行されず,挙動に不安があった🌀

$ act --watch

(中略)

[Python package/build-1]   ❌  Failure - Main Test with pytest
[Python package/build-2]   ❌  Failure - Main Test with pytest
[Python package/build-3]   ❌  Failure - Main Test with pytest

act --env-fileact --secret-file コマンド

ワークフローに「環境変数」「シークレット」を設定する場合,以下のように --env-file--secret-file オプションを使ってファイルを読み込める.直接設定するなら --env--secret オプションも使えるけど,特にシークレットはファイルを読み込むのが良さそう.

$ act --env-file my.env
$ act --secret-file my.secrets

act pull_requestact schedule コマンド

実は act コマンドを実行すると GitHub に対する push イベントをトリガーするワークフローを実行している.例えば,プルリクエスト時に一部異なるワークフローを実行しているような場合は act pull_request コマンドを実行すると pull_request イベントをトリガーするワークフローを実行できる.スケジュール実行をしているような場合は act schedule コマンドを実行すると schedule イベントをトリガーするワークフローを実行できる.

on:
  push:
    branches:
      - master
    pull_request:
      - master

もしワークフローの中で github.event.pull_request.* などのイベントプロパティに依存している場合は --eventpath オプションを組み合わせる.詳しくは Wiki の Beginner's guide に載っている.

github.com

まとめ

GitHub Actions のワークフローをローカル環境で実行できる「act」を試した❗️

調べたところ「act」は GitHub Blog でも紹介されていた.

github.blog

実際に試してみて act は便利だったけど,当然ながら GitHub Actions を完全再現できてるわけではなく,例えば「実行できる環境が Ubuntu 限定」や,前に紹介した GitHub Actions の「reusable workflow(ワークフローの再利用)未対応」などは気にしておく必要があると思う.あとワークフローがエラーになって再試行で直るなど不安定な挙動もあって,もう少し使ってみようと思う🌀

$ act
Error: remote reusable workflows are currently not supported (see https://github.com/nektos/act/issues/826 for updates)

kakakakakku.hatenablog.com