AWS CloudFormation のテンプレートとスタックを便利に操作できる AWS 公式ツール「rain」を紹介する.僕自身も AWS CloudFormation スタックを試行錯誤しながら実装するときによく rain を使っている.rain には機能が多くあるけど,今回は個人的に便利だと思う「10点」にしぼって紹介する❗️
セットアップ
Homebrew で簡単にセットアップできる.サブコマンドは大きく「スタック用」と「テンプレート用」でたくさんある❗️
$ brew install rain

$ rain --version
Rain v1.3.3 darwin/arm64

$ rain -h
Rain is a command line tool for working with AWS CloudFormation templates and stacks

Usage:
  rain [command]

Stack commands:
  cat         Get the CloudFormation template from a running stack
  deploy      Deploy a CloudFormation stack from a local template
  logs        Show the event log for the named stack
  ls          List running CloudFormation stacks
  rm          Delete a running CloudFormation stack
  stackset    This command manipulates stack sets.
  watch       Display an updating view of a CloudFormation stack

Template commands:
  build       Create CloudFormation templates
  diff        Compare CloudFormation templates
  fmt         Format CloudFormation templates
  merge       Merge two or more CloudFormation templates
  pkg         Package local artifacts into a template
  tree        Find dependencies of Resources and Outputs in a local template

Other Commands:
  completion  Generate the autocompletion script for the specified shell
  console     Login to the AWS console
  help        Help about any command
  info        Show your current configuration
便利な操作を紹介する
1. rain build でテンプレートの雛形を作ろう
AWS CloudFormation テンプレートを作るときに個人的によくやるのは AWS CloudFormation のドキュメントを検索して,YAML の雛形をコピーペーストして,あとは必須項目を埋めていく流れだけど,rain build コマンドを使うと AWS CloudFormation テンプレートの雛形をサクッと作れる👌
$ rain build AWS::S3::Bucket
AWSTemplateFormatVersion: "2010-09-09"

Description: Template generated by rain

Resources:
  MyBucket:
    Type: AWS::S3::Bucket
    Properties:
      AccelerateConfiguration: # Optional
        AccelerationStatus: CHANGEME
      AccessControl: CHANGEME # Optional

(中略)
AWS::S3::Bucket は設定が多く200行以上も出力される.CHANGEME に値を設定したり,Optional は必要なければ消したりしながら組み立てる.また最初はシンプルに作りたいことも多いと思う.--bare オプションを設定すると必要最低限のテンプレートの雛形を作れる.AWS::S3::Bucket には必須項目はなく,以下のように驚くほどシンプルになる❗️
$ rain build --bare AWS::S3::Bucket
AWSTemplateFormatVersion: "2010-09-09"

Description: Template generated by rain

Resources:
  MyBucket:
    Type: AWS::S3::Bucket
rain build コマンドには複数のリソースを指定できる.以下の例は AWS::EC2::VPC と AWS::EC2::Subnet を指定している.VpcId !Ref MyVPC のように紐付きまでは自動的に解決されないところは注意点かなぁー.
$ rain build --bare AWS::EC2::VPC AWS::EC2::Subnet
AWSTemplateFormatVersion: "2010-09-09"

Description: Template generated by rain

Resources:
  MySubnet:
    Type: AWS::EC2::Subnet
    Properties:
      VpcId: CHANGEME

  MyVPC:
    Type: AWS::EC2::VPC
2. rain build --list でリソース一覧を検索しよう
rain build --list コマンドを使うと AWS CloudFormation でサポートしているリソース一覧を確認できる.現時点で1000種類以上もあるため,僕は peco と組み合わせて検索できるようにしている(おすすめ!).適当にエイリアスを設定しておくと便利で,よく使っている👾
$ rain build --list | head -n 5
AWS::ACMPCA::Certificate
AWS::ACMPCA::CertificateAuthority
AWS::ACMPCA::CertificateAuthorityActivation
AWS::ACMPCA::Permission
AWS::APS::RuleGroupsNamespace

$ rain build --list | wc -l
    1032

$ rain build --list | peco | pbcopy

$ alias cr='rain build --list | peco | pbcopy'
3. rain deploy でデプロイしよう
次に AWS::S3::Bucket をデプロイする.デプロイするときは rain deploy コマンドを使う.aws cloudformation deploy コマンドとあまり差がなさそうに思うけど,影響のあるリソース一覧が表示されたり,実行するかどうか (Y/n) のプロンプトが表示されたり,より価値のある情報が確認できるようになっている.
$ rain build --bare AWS::S3::Bucket > s3-bare.yaml

$ rain deploy s3-bare.yaml
CloudFormation will make the following changes:
Stack s3-bare:
  + AWS::S3::Bucket MyBucket
Do you wish to continue? (Y/n) Y
Deploying template 's3-bare.yaml' as stack 's3-bare' in ap-northeast-1.
Stack s3-bare: CREATE_COMPLETE
Successfully deployed s3-bare
rain の特徴の一つに「必要なログのみを表示する」という思想があって(Rain also filters out uninteresting log messages by default so you just see the errors that require attention.),rain コマンドで出力されるログや rain logs コマンドで取得できるログなどはデフォルトで非常に工夫されている.
$ rain logs s3-bare
No interesting log messages to display. To see everything, use the --all flag

$ rain logs s3-bare --all
Apr 16 00:00:00 s3-bare/s3-bare (AWS::CloudFormation::Stack) CREATE_COMPLETE
Apr 16 00:00:00 s3-bare/MyBucket (AWS::S3::Bucket) CREATE_COMPLETE
Apr 16 00:00:00 s3-bare/MyBucket (AWS::S3::Bucket) CREATE_IN_PROGRESS "Resource creation Initiated"
Apr 16 00:00:00 s3-bare/MyBucket (AWS::S3::Bucket) CREATE_IN_PROGRESS
Apr 16 00:00:00 s3-bare/s3-bare (AWS::CloudFormation::Stack) CREATE_IN_PROGRESS "User Initiated"
Apr 16 00:00:00 s3-bare/s3-bare (AWS::CloudFormation::Stack) REVIEW_IN_PROGRESS "User Initiated"
4. rain ls でスタック一覧を確認しよう
rain ls コマンドを使うとスタック一覧とステータスを確認できる.aws cloudformation list-stacks コマンドでも同じ情報は取得できるけど,無駄な情報がなくシンプル👍
$ rain ls
CloudFormation stacks in ap-northeast-1:
  s3-bare: CREATE_COMPLETE
5. rain rm でスタックを削除しよう
rain rm コマンドでスタックを削除できる.
$ rain rm s3-bare
Stack s3-bare: CREATE_COMPLETE
Are you sure you want to delete this stack? (y/N) y
Successfully deleted stack 's3-bare'
6. rain deploy でパラメータを設定しよう
以下のように Amazon S3 バケット名をパラメータから取得するように変更した.このテンプレートを aws cloudformation deploy コマンドでデプロイするときはパラメータを指定しないと ValidationError になる.
AWSTemplateFormatVersion: "2010-09-09"

Description: Template generated by rain

Parameters:
  BucketName:
    Type: String

Resources:
  MyBucket:
    Type: AWS::S3::Bucket
    Properties:
      BucketName: !Ref BucketName
rain deploy コマンドを使うと未指定の場合はインタラクティブに指定できる❗️これも便利〜
$ rain deploy s3-with-parameters.yaml
Enter a value for parameter 'BucketName': kakakakakku-s3-with-parameters
CloudFormation will make the following changes:
Stack s3-with-parameters:
  + AWS::S3::Bucket MyBucket
Do you wish to continue? (Y/n) Y
Deploying template 's3-with-parameters.yaml' as stack 's3-with-parameters' in ap-northeast-1.
Stack s3-with-parameters: CREATE_COMPLETE
Successfully deployed s3-with-parameters
スタックを一度消しておく.
$ rain rm s3-with-parameters
7. rain deploy で失敗してもそのままやり直そう
今度は Amazon S3 バケット名として許容されていない _ を含めてデプロイするとエラーになり,そのままもう一度 rain deploy コマンドを実行すると Deleted existing, empty stack. というメッセージが出力されて自動的に ROLLBACK_COMPLETE で失敗したスタックを削除してくれる.
$ rain deploy s3-with-parameters.yaml
Enter a value for parameter 'BucketName': kakakakakku_s3_with_parameters
CloudFormation will make the following changes:
Stack s3-with-parameters:
  + AWS::S3::Bucket MyBucket
Do you wish to continue? (Y/n) Y
Deploying template 's3-with-parameters.yaml' as stack 's3-with-parameters' in ap-northeast-1.
Stack s3-with-parameters: ROLLBACK_COMPLETE
Messages:
  - MyBucket: Bucket name should not contain '_'
failed deploying stack 's3-with-parameters'

$ rain deploy s3-with-parameters.yaml
Deleted existing, empty stack.
Enter a value for parameter 'BucketName' (existing value: kakakakakku_s3_with_parameters): kakakakakku-s3-with-parameters
CloudFormation will make the following changes:
Stack s3-with-parameters:
  + AWS::S3::Bucket MyBucket
Do you wish to continue? (Y/n) Y
Deploying template 's3-with-parameters.yaml' as stack 's3-with-parameters' in ap-northeast-1.
Stack s3-with-parameters: CREATE_COMPLETE
Successfully deployed s3-with-parameters
AWS CloudFormation スタックを作ったことがある人は経験していると思うけど,スタックを作るのに失敗して ROLLBACK_COMPLETE になると,1度スタックを削除する必要があって,地味にこの作業が手間に感じる.rain deploy コマンドではその手間を削減してくれて最高❗️
8. rain fmt でテンプレートを整形しよう
rain fmt コマンドを使うと AWS CloudFormation テンプレートを整形できる.整形できることを確認するために AWS::S3::Bucket のテンプレートを以下のように一部修正した.
AWSTemplateFormatVersion: "2010-09-09"

Description: Template generated by rain

Parameters:
  BucketName:
    Type: String
    Default: "kakakakakku-s3-bucket"

Resources:
  MyBucket:
    Type: AWS::S3::Bucket
    Properties:
      BucketName: !Ref BucketName
      Tags:
        - Key: 'Key1'
          Value: 'Value1'

Outputs:
  MyBucketArn:
    Value:
      Fn::GetAtt:
        - MyBucket
        - Arn
このテンプレートに rain fmt コマンドを実行すると整形できる.
- 文字列の
"や'が削除された Fn::GetAtt組み込み関数が短縮形の!GetAttになって1行にまとまった
rain fmt s3-before-format.yaml
AWSTemplateFormatVersion: "2010-09-09"

Description: Template generated by rain

Parameters:
  BucketName:
    Type: String
    Default: kakakakakku-s3-bucket

Resources:
  MyBucket:
    Type: AWS::S3::Bucket
    Properties:
      BucketName: !Ref BucketName
      Tags:
        - Key: Key1
          Value: Value1

Outputs:
  MyBucketArn:
    Value: !GetAtt MyBucket.Arn
他にも YAML / JSON を相補変換したりもできる(これは cfn-flip コマンドでもできるけど!).
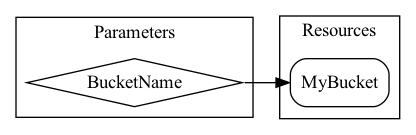
9. rain tree で Resources と Outputs の依存関係を図にしよう
rain tree コマンドを使うと AWS CloudFormation テンプレートから Resources と Outputs の依存関係を図にできる.dot フォーマットで出力されるため,dot コマンドを使えば png ファイルなどに変換できる.
$ rain tree -d s3-with-parameters.yaml
digraph {
    rankdir=LR;
    concentrate=true;
    subgraph cluster_Parameters {
        label="Parameters";
        "Parameters: BucketName" [label="BucketName" shape=diamond];
    }

    subgraph cluster_Resources {
        label="Resources";
        "Resources: MyBucket" [label="MyBucket" shape=Mrecord];
    }

    subgraph cluster_Outputs {
        label="Outputs";
    }

    "Parameters: BucketName" -> "Resources: MyBucket";
}

$ rain tree -d s3-with-parameters.yaml > s3-with-parameters.dot

$ dot -T png s3-with-parameters.dot -o s3-with-parameters.png
10. rain cat で AWS SAM リソースの変換後テンプレートを確認しよう
rain cat コマンドを使うと AWS CloudFormation スタックのテンプレートを確認できる.さらに --transformed オプションを付けると AWS SAM などマクロを使った AWS CloudFormation テンプレートの変換後を確認できる.今回は AWS SAM のサンプルテンプレートを用意してスタックを作る.
AWSTemplateFormatVersion: '2010-09-09'
Transform: AWS::Serverless-2016-10-31

Resources:
  HelloWorldFunction:
    Type: AWS::Serverless::Function
    Properties:
      CodeUri: hello_world/
      Handler: app.lambda_handler
      Runtime: python3.9
      Architectures:
        - x86_64
次に rain cat template --transformed コマンドを実行すると,以下のようにリソース名が AWS::Lambda::Function になっている.マクロによってどのように変換されたのかを確認したいときに使える.
$ rain cat template --transformed
AWSTemplateFormatVersion: "2010-09-09"

Resources:
  HelloWorldFunction:
    Type: AWS::Lambda::Function
    Properties: {Code: {S3Bucket: rain-artifacts-000000000000-ap-northeast-1, S3Key: b769a6f86744588f72b9c40013aec639a9dd8f8fdcbca559029a388836f8fe12}, Handler: app.lambda_handler, Role: !GetAtt HelloWorldFunctionRole.Arn, Runtime: python3.9, Tags: [{Key: 'lambda:createdBy', Value: SAM}], Architectures: [x86_64]}

  HelloWorldFunctionRole:
    Type: AWS::IAM::Role
    Properties: {AssumeRolePolicyDocument: {Version: "2012-10-17", Statement: [{Action: ['sts:AssumeRole'], Effect: Allow, Principal: {Service: [lambda.amazonaws.com]}}]}, ManagedPolicyArns: ['arn:aws:iam::aws:policy/service-role/AWSLambdaBasicExecutionRole'], Tags: [{Key: 'lambda:createdBy', Value: SAM}]}
まとめ
AWS CloudFormation のテンプレートとスタックを便利に操作できる AWS 公式ツール「rain」を紹介した.aws cloudformation コマンドを使うよりも便利なので,AWS CloudFormation を使っていたら試してみると良いかと❗️おすすめです〜