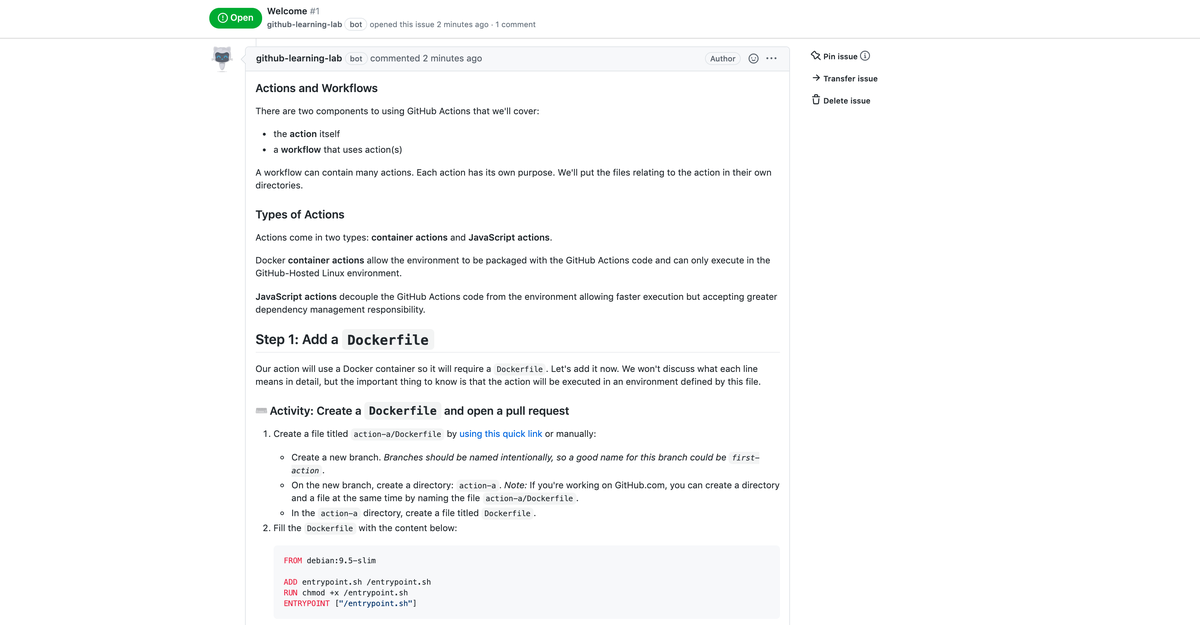
GitHub を学ぶときに「GitHub Learning Lab」を使うと便利!という紹介記事を6月に書いた.最近 GitHub Actions を使う機会があり,入門するために「GitHub Learning Lab」の「GitHub Actions: Hello World」コースを受講した.今回も非常に良かった!
GitHub Actions: Hello World
「GitHub Actions: Hello World」は GitHub Actions を学ぶ入門コースとなる.現在はまだ日本語に翻訳されてなく,英語を選択する必要はあるけど,Bot / Issue / Pull Request を活用したインタラクティブな構成になっていて,楽しく学べる.以下のステップを進めていくことになり,最終的には GitHub Actions を使って,Docker イメージをビルドして実行できるようになる.
- Step 1 : Add a Dockerfile
- Step 2 : Add an entrypoint script
- Step 3 : Add an action.yml file
- Step 4 : Start your workflow file
- Step 5 : Run an action from your workflow file
- Step 6 : Trigger the workflow
- Step 7 : Incorporate the workflow
セットアップ
まず「Start free course」ボタンを押してセットアップをする.今回はリポジトリ公開設定として Private を選ぶ.すると,自動的にコースで使うリポジトリ hello-github-actions が作られる.

さっそく Issue に Bot から Step 1 の手順がコメントされる.進めていくぞ!

Step 1 : Add a Dockerfile
最初に Issue を読みながら GitHub Actions の概要を学んでいく.「アクション」には「Docker Container (Linux)」と「JavaScript (Linux, MacOS, Windows)」の2種類があり,今回は「Docker Container」を使っていく.
まず,first-action ブランチを作り,以下のように action-a/Dockerfile を実装したら Pull Request を作る.GitHub の基本的な操作は書いてなく,慣れていない場合は前提コース「Introduction to GitHub」コースを受講しておく必要がありそう.
FROM debian:9.5-slim

ADD entrypoint.sh /entrypoint.sh
RUN chmod +x /entrypoint.sh
ENTRYPOINT ["/entrypoint.sh"]
Step 2 : Add an entrypoint script
次に ENTRYPOINT に指定したスクリプト action-a/entrypoint.sh を実装する.単純に echo するだけではなく,GitHub Actions の inputs シンタックスを試すため,環境変数も含めておく.
#!/bin/sh -l

sh -c "echo Hello world my name is $INPUT_MY_NAME"
Step 3 : Add an action.yml file
今度は GitHub Actions のアクションを定義していくため action.yml を作る.ポイントは runs シンタックスを使って Dockerfile を指定している点と,inputs シンタックスを使って環境変数のデフォルト値を設定している点になる.branding シンタックスはアクションを GitHub Marketplace に公開するときに使えるアイコン設定(Feather から選べる)となり,今回は関係なさそう.
name: "Hello Actions"
description: "Greet someone"
author: "octocat@github.com"

inputs:
  MY_NAME:
    description: "Who to greet"
    required: true
    default: "World"

runs:
  using: "docker"
  image: "Dockerfile"

branding:
  icon: "mic"
  color: "purple"
Step 4 : Start your workflow file
アクションを定義したため,次にワークフローを定義していく.設定ファイルは .github/workflows/main.yml に置く.
name: ワークフロー名on: ワークフローを実行するトリガー設定jobs: アクション設定uses: actions/checkout@v1: リポジトリをチェックアウトする(現在は既にv2もリリースされている)
name: A workflow for my Hello World file
on: push
jobs:
  build:
    name: Hello world action
    runs-on: ubuntu-latest
    steps:
      - uses: actions/checkout@v1
      - uses: ./action-a
        with:
          MY_NAME: "Mona"
Step 5 : Run an action from your workflow file
実際にワークフローを確認すると,正常に実行されていた.
Step 6 : Trigger the workflow
標準出力に Hello world my name is Mona と表示されていた.

Step 7 : Incorporate the workflow
最後は Pull Request を master ブランチに Merge する.
最終的に Issue / Pull Request は以下のようになっていた.今回も非常に良かった!楽しかった!

まとめ
「GitHub Learning Lab」の「GitHub Actions: Hello World」コースを受講して,GitHub Actions に入門した.一歩一歩インタラクティブに進めることで理解度を高められる点は,やはり「GitHub Learning Lab」の最大のメリットだと思う.実は「GitHub Learning Lab」には,コースとドキュメントをまとめた「Learning Path」という仕組みもあり,例えば「DevOps with GitHub Actions」という Learning Path もある.「Publish to GitHub Packages」コースは特に気になる!
- GitHub Actions: Hello World
- GitHub Actions: Continuous Integration
- GitHub Actions: Publish to GitHub Packages
- GitHub Actions: Continuous Delivery with Azure
- GitHub Actions: Continuous Delivery with AWS
- GitHub Actions: Writing JavaScript Actions
- GitHub Actions: Write Docker container actions
- GitHub Actions: Using GitHub Script
- Migrating from Azure Pipelines to GitHub Actions
- Migrating from Jenkins to GitHub Actions
- Migrating from CircleCI to GitHub Actions