kakakakakku blog

Weekly Tech Blog: Keep on Learning!

Terraform S3 バックエンドで使う S3 バケットを Terraform でデプロイする

Terraform で Amazon S3 バックエンドを使う場合に「Amazon S3 バケット自体をどうやってデプロイする?」というブートストラップ問題がある.よく聞く選択肢としてはマネジメントコンソール・AWS CLI・AWS CloudFormation などがある.他にも Terraform で解決する選択肢もあって簡単にまとめておく❗️

簡単に言うと,最初は「ローカルバックエンド」で Amazon S3 バケットをデプロイして,その後に Amazon S3 バックエンドの設定を追加して terraform.tfstate ファイルを Amazon S3 バケットに引っ越すイメージ👌

Step.1

まずは terraform.tfproviders.tf を準備しておく.

👾 terraform.tf

terraform {
  required_version = "~> 1.13.0"

  required_providers {
    aws = {
      source  = "hashicorp/aws"
      version = "~> 6.13.0"
    }
  }
}

👾 providers.tf

provider "aws" {
  region = "ap-northeast-1"
}

Step.2

次に backend.tf に Amazon S3 バケットを実装する.

resource "aws_s3_bucket" "tfstate" {
  bucket = "kakakakakku-tfstate-bootstrap"
}

ここで一度 terraform apply を実行しておく.すると「ローカルバックエンド」で Amazon S3 バケットをデプロイできる👌

$ terraform apply

Terraform used the selected providers to generate the following execution plan. Resource
actions are indicated with the following symbols:
  + create

Terraform will perform the following actions:

  # aws_s3_bucket.tfstate will be created
  + resource "aws_s3_bucket" "tfstate" {
      + acceleration_status         = (known after apply)
      + acl                         = (known after apply)
      + arn                         = (known after apply)
      + bucket                      = "kakakakakku-tfstate-bootstrap"
      + bucket_domain_name          = (known after apply)
      + bucket_prefix               = (known after apply)
      + bucket_region               = (known after apply)
      + bucket_regional_domain_name = (known after apply)
      + force_destroy               = false
      + hosted_zone_id              = (known after apply)
      + id                          = (known after apply)
      + object_lock_enabled         = (known after apply)
      + policy                      = (known after apply)
      + region                      = "ap-northeast-1"
      + request_payer               = (known after apply)
      + tags_all                    = (known after apply)
      + website_domain              = (known after apply)
      + website_endpoint            = (known after apply)

      + cors_rule (known after apply)

      + grant (known after apply)

      + lifecycle_rule (known after apply)

      + logging (known after apply)

      + object_lock_configuration (known after apply)

      + replication_configuration (known after apply)

      + server_side_encryption_configuration (known after apply)

      + versioning (known after apply)

      + website (known after apply)
    }

Plan: 1 to add, 0 to change, 0 to destroy.

(中略)

Apply complete! Resources: 1 added, 0 changed, 0 destroyed.
Step.3

今度は backend.tf に Amazon S3 バックエンドの設定を追加する.

👾 backend.tf

terraform {
  backend "s3" {
    region       = "ap-northeast-1"
    bucket       = "kakakakakku-tfstate-bootstrap"
    key          = "terraform.tfstate"
    use_lockfile = true
  }
}

resource "aws_s3_bucket" "tfstate" {
  bucket = "kakakakakku-tfstate-bootstrap"
}

そして terraform init を実行すると,自動的に terraform.tfstate ファイルが Amazon S3 バケットにコピーされる👌

$ terraform init
Initializing the backend...
Do you want to copy existing state to the new backend?
  Pre-existing state was found while migrating the previous "local" backend to the
  newly configured "s3" backend. No existing state was found in the newly
  configured "s3" backend. Do you want to copy this state to the new "s3"
  backend? Enter "yes" to copy and "no" to start with an empty state.

  Enter a value: yes


Successfully configured the backend "s3"! Terraform will automatically
use this backend unless the backend configuration changes.
Initializing provider plugins...
- Reusing previous version of hashicorp/aws from the dependency lock file
- Using previously-installed hashicorp/aws v6.13.0

Terraform has been successfully initialized!

You may now begin working with Terraform. Try running "terraform plan" to see
any changes that are required for your infrastructure. All Terraform commands
should now work.

If you ever set or change modules or backend configuration for Terraform,
rerun this command to reinitialize your working directory. If you forget, other
commands will detect it and remind you to do so if necessary.

terraform.tfstate ファイルも確認できた.

$ aws s3 ls kakakakakku-tfstate-bootstrap
2025-09-19 00:31:25       2950 terraform.tfstate

次にローカルバックエンドの terraform.tfstate ファイルを削除してから terraform plan を実行してみると No changes. になって期待通り👌イイ感じに Amazon S3 バックエンドをブートストラップできた.

$ rm terraform.tfstate terraform.tfstate.backup

$ terraform plan
No changes. Your infrastructure matches the configuration.

Step.4

ドキュメントには「バージョニングを有効化せよ!」と書いてある.

Warning! It is highly recommended that you enable Bucket Versioning on the S3 bucket to allow for state recovery in the case of accidental deletions and human error.

よって backend.tf を更新して,Amazon S3 バケットの設定を変更する.もちろん最初から設定しておくのもヨシ❗️

👾 backend.tf

terraform {
  backend "s3" {
    region       = "ap-northeast-1"
    bucket       = "kakakakakku-tfstate-bootstrap"
    key          = "terraform.tfstate"
    use_lockfile = true
  }
}

resource "aws_s3_bucket" "tfstate" {
  bucket = "kakakakakku-tfstate-bootstrap"
}

resource "aws_s3_bucket_versioning" "tfstate" {
  bucket = aws_s3_bucket.tfstate.id
  versioning_configuration {
    status = "Enabled"
  }
}

terraform apply を実行すると「Amazon S3 バックエンド」前提でバージョニングを有効化できた👌

$ terraform apply

Terraform used the selected providers to generate the following execution plan. Resource
actions are indicated with the following symbols:
  + create

Terraform will perform the following actions:

  # aws_s3_bucket_versioning.tfstate will be created
  + resource "aws_s3_bucket_versioning" "tfstate" {
      + bucket = "kakakakakku-tfstate-bootstrap"
      + id     = (known after apply)
      + region = "ap-northeast-1"

      + versioning_configuration {
          + mfa_delete = (known after apply)
          + status     = "Enabled"
        }
    }

Plan: 1 to add, 0 to change, 0 to destroy.

(中略)

Apply complete! Resources: 1 added, 0 changed, 0 destroyed.
関連情報

discuss.hashicorp.com

discuss.hashicorp.com

Pulumi で API Gateway と Lambda のデプロイに入門できる「Lambda-backed REST API」

Pulumi で Amazon API Gateway と AWS Lambda 関数のデプロイに入門できる How-to Guides「Lambda-backed REST API」を試してみた❗️最近 Pulumi の導入検証をしてて色々と試しているところ.

www.pulumi.com

アーキテクチャ図

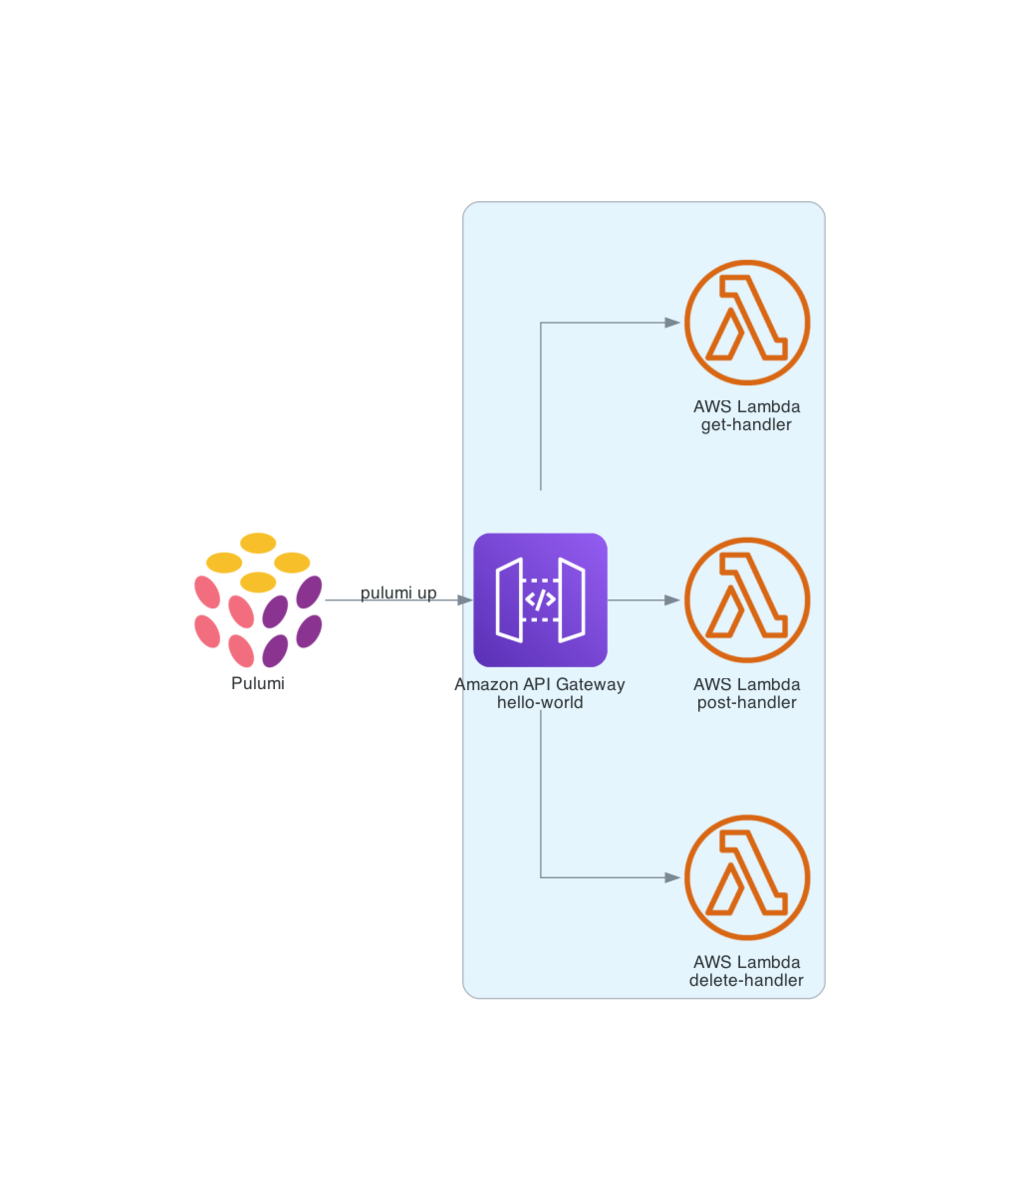
以下のようなアーキテクチャをデプロイする.

手順: Prerequisites

まずは pulumi/examples リポジトリを clone しておく.

github.com

あとは How-to Guides の手順通りに進めれば OK👌

$ cd aws-ts-apigateway-lambda-serverless
$ pulumi stack init aws-ts-apigateway-lambda-serverless
$ pulumi config set aws:region us-east-2
$ yarn install

手順: Deploy the App

準備ができたら pulumi up コマンドを実行する.ちなみにプレビュー結果は少し違っていた.手順には + 20 created と載っているけど,実際に実行したら + 41 to create になっていた.

$ pulumi up
Previewing update (aws-ts-apigateway-lambda-serverless)

(中略)

     Type                             Name                                                                     Plan       Info
 +   pulumi:pulumi:Stack              aws-ts-apigateway-lambda-serverless-aws-ts-apigateway-lambda-serverless  create     3 messages
 +   ├─ aws:iam:Role                  delete-handler                                                           create
 +   ├─ aws:iam:Role                  get-handler                                                              create
 +   ├─ aws:iam:Role                  post-handler                                                             create
 +   ├─ aws:iam:RolePolicyAttachment  delete-handler-d32a66fa                                                  create
 +   ├─ aws:iam:RolePolicyAttachment  delete-handler-1b4caae3                                                  create
 +   ├─ aws:iam:RolePolicyAttachment  delete-handler-019020e7                                                  create
 +   ├─ aws:iam:RolePolicyAttachment  get-handler-a1de8170                                                     create
 +   ├─ aws:iam:RolePolicyAttachment  post-handler-b5aeb6b6                                                    create
 +   ├─ aws:iam:RolePolicyAttachment  post-handler-7cd09230                                                    create
 +   ├─ aws:iam:RolePolicyAttachment  delete-handler-e1a3786d                                                  create
 +   ├─ aws:iam:RolePolicyAttachment  delete-handler-4aaabb8e                                                  create
 +   ├─ aws:iam:RolePolicyAttachment  post-handler-e1a3786d                                                    create
 +   ├─ aws:iam:RolePolicyAttachment  post-handler-a1de8170                                                    create
 +   ├─ aws:iam:RolePolicyAttachment  get-handler-4aaabb8e                                                     create
 +   ├─ aws:iam:RolePolicyAttachment  delete-handler-7cd09230                                                  create
 +   ├─ aws:iam:RolePolicyAttachment  delete-handler-b5aeb6b6                                                  create
 +   ├─ aws:iam:RolePolicyAttachment  post-handler-d32a66fa                                                    create
 +   ├─ aws:lambda:Function           delete-handler                                                           create
 +   ├─ aws:lambda:Function           get-handler                                                              create
 +   ├─ aws:iam:RolePolicyAttachment  post-handler-019020e7                                                    create
 +   ├─ aws:iam:RolePolicyAttachment  post-handler-1b4caae3                                                    create
 +   ├─ aws:iam:RolePolicyAttachment  get-handler-7cd09230                                                     create
 +   ├─ aws:iam:RolePolicyAttachment  get-handler-019020e7                                                     create
 +   ├─ aws:iam:RolePolicyAttachment  delete-handler-a1de8170                                                  create
 +   ├─ aws:iam:RolePolicyAttachment  get-handler-e1a3786d                                                     create
 +   ├─ aws:iam:RolePolicyAttachment  get-handler-74d12784                                                     create
 +   ├─ aws:iam:RolePolicyAttachment  get-handler-d32a66fa                                                     create
 +   ├─ aws:iam:RolePolicyAttachment  post-handler-74d12784                                                    create
 +   ├─ aws:iam:RolePolicyAttachment  get-handler-1b4caae3                                                     create
 +   ├─ aws:iam:RolePolicyAttachment  get-handler-b5aeb6b6                                                     create
 +   ├─ aws:iam:RolePolicyAttachment  delete-handler-74d12784                                                  create
 +   ├─ aws:iam:RolePolicyAttachment  post-handler-4aaabb8e                                                    create
 +   ├─ aws:lambda:Function           post-handler                                                             create
 +   └─ aws-apigateway:index:RestAPI  hello-world                                                              create
 +      ├─ aws:apigateway:RestApi     hello-world                                                              create
 +      ├─ aws:apigateway:Deployment  hello-world                                                              create     1 warning
 +      ├─ aws:apigateway:Stage       hello-world                                                              create
 +      ├─ aws:lambda:Permission      hello-world-d21e9c98                                                     create
 +      ├─ aws:lambda:Permission      hello-world-29d762f7                                                     create
 +      └─ aws:lambda:Permission      hello-world-86405973                                                     create

(中略)

Outputs:
    endpointUrl: [unknown]

Resources:
    + 41 to create

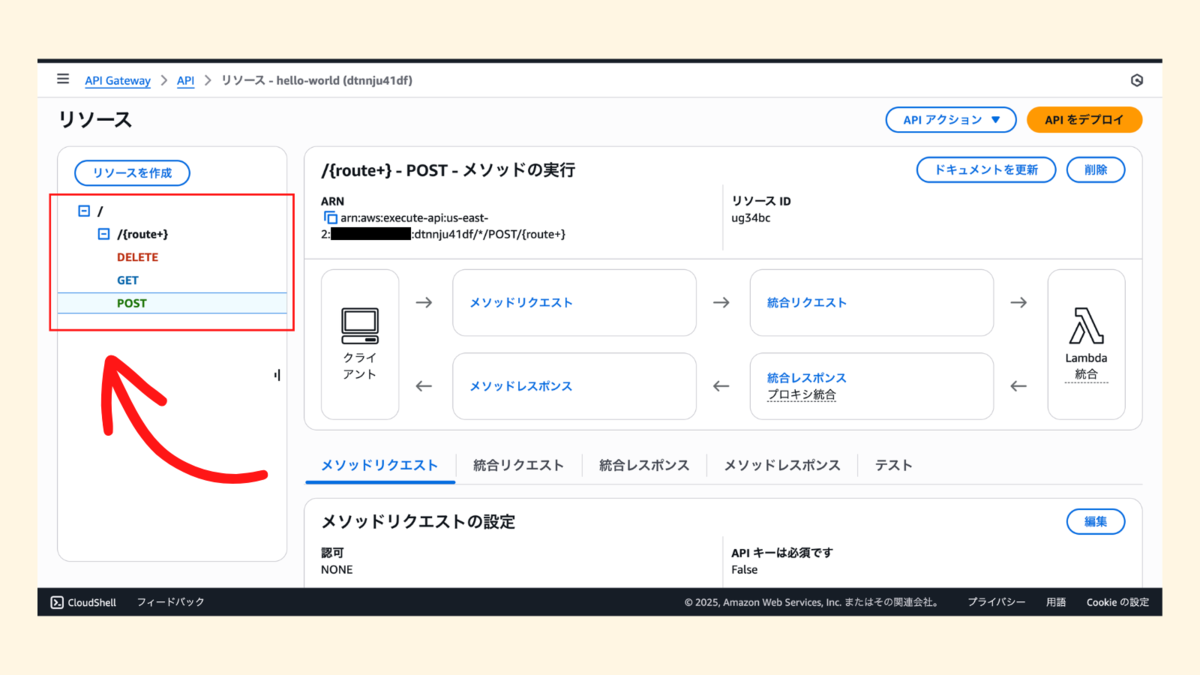
デプロイ確認

動作確認

$ curl -s -X GET https://dtnnju41df.execute-api.us-east-2.amazonaws.com/stage/example | jq .
{
  "route": "example",
  "affirmation": "Nice job, you've done it! :D",
  "requestBodyEcho": null
}

$ curl -s -X POST https://dtnnju41df.execute-api.us-east-2.amazonaws.com/stage/example | jq .
{
  "message": "POST successful"
}

$ curl -s -X DELETE https://dtnnju41df.execute-api.us-east-2.amazonaws.com/stage/example | jq .
{
  "message": "DELETE successful"
}

手順: Clean Up

最後は削除しておく🗑️

$ pulumi destroy
$ pulumi stack rm

aws.lambda.Function と aws.lambda.CallbackFunction

How-to Guides の手順にはコード解説は入ってなく追加で少し調べていたら,Pulumi には aws.lambda.Functionaws.lambda.CallbackFunction があって,今回は aws.lambda.CallbackFunction が使われていた.

www.pulumi.com www.pulumi.com

aws.lambda.CallbackFunction を使うと AWS Lambda 関数のコードを Pulumi コードとしてインラインで実装できる.そして Pulumi コンパイラによって自動的にデプロイできる仕組みになっていて,現状では TypeScript 限定でサポートされている💡

ドキュメントには以下のサンプルコードが載っていた.callback というパラメタにコールバック関数をそのまま実装できる.

import * as aws from "@pulumi/aws";

// Create an AWS Lambda function that fetches the Pulumi website and returns the HTTP status
const lambda = new aws.lambda.CallbackFunction("fetcher", {
    callback: async(event) => {
        try {
            const res = await fetch("https://www.pulumi.com/robots.txt");
            console.info("status", res.status);
            return res.status;
        }
        catch (e) {
            console.error(e);
            return 500;
        }
    },
});

そして今回の How-to Guides「Lambda-backed REST API」だとコールバック関数を直接実装するパターン(post-handlerdelete-handler)と別の handler.ts を呼び出すパターン(get-handler)の2種類があった.

// Create Lambda functions for our API
const handlerFunction = new aws.lambda.CallbackFunction("get-handler", {
  callback: handler,
  runtime: aws.lambda.Runtime.NodeJS18dX,
});

const postHandlerFunction = new aws.lambda.CallbackFunction("post-handler", {
  callback: async (event: APIGatewayProxyEvent): Promise<APIGatewayProxyResult> => {
    console.log("Inline event handler");
    console.log(event);
    return {
      statusCode: 200,
      body: JSON.stringify({ message: "POST successful" }),
    };
  },
  runtime: aws.lambda.Runtime.NodeJS18dX,
});

const deleteHandlerFunction = new aws.lambda.CallbackFunction("delete-handler", {
  callback: async (event: APIGatewayProxyEvent): Promise<APIGatewayProxyResult> => {
    console.log(event);
    return {
      statusCode: 200,
      body: JSON.stringify({ message: "DELETE successful" }),
    };
  },
  runtime: aws.lambda.Runtime.NodeJS18dX,
});

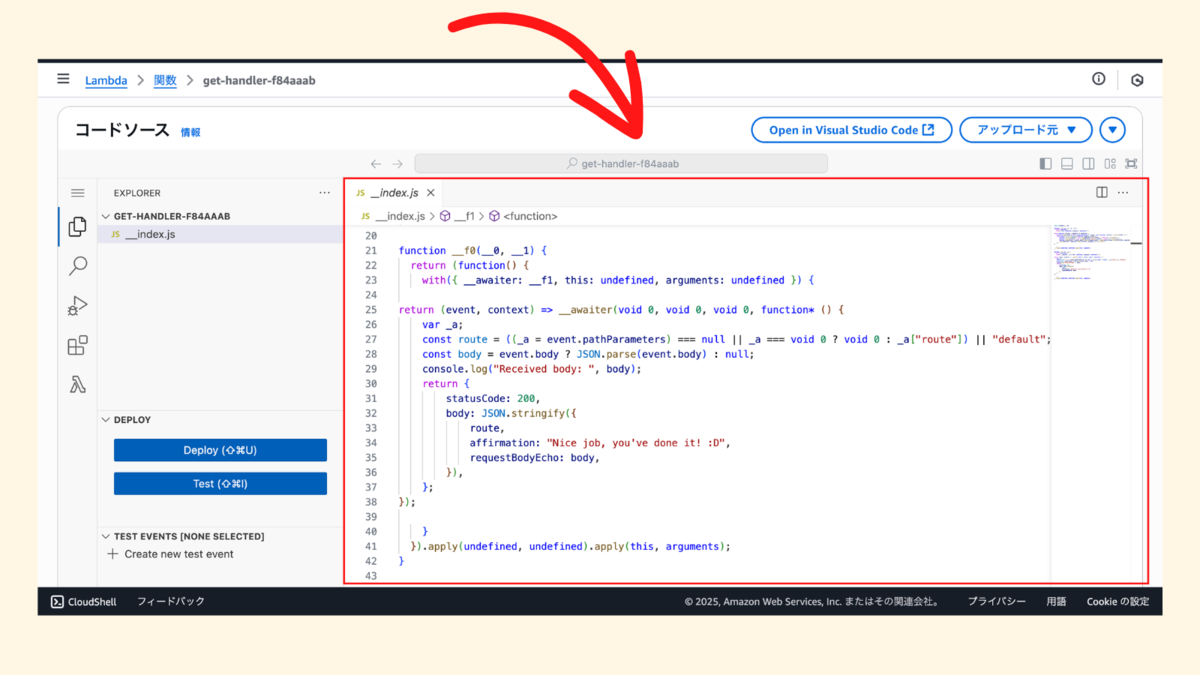
ちなみに aws.lambda.CallbackFunction でデプロイされた AWS Lambda 関数 get-handler は以下のようになっていた.

この callback というパラメタに関しては「Function serialization」というドキュメントに詳しく載っている📝

www.pulumi.com

Node.js 22 にアップデート

今回試した How-to Guides「Lambda-backed REST API」は2025年9月1日に非推奨になった Node.js 18 ランタイムを使っていて今後使えなくなる可能性がある.

docs.aws.amazon.com

よって最新の Node.js 22 ランタイムに変更するプルリクエストを出しておいた🎉 merge してもらえるとイイな〜

github.com

AWS Toolkit for VS Code の LocalStack 統合を試す

2025年9月11日に AWS launches LocalStack integration in VS Code IDE to simplify local testing for serverless applications というアップデートがリリースされていた💡簡単に言うと AWS Toolkit for VS Code(VS Code 拡張機能)と LocalStack を簡単に統合できるようになってデプロイやテストがしやすくなったという内容だった.

aws.amazon.com

AWS Toolkit for VS Code と endpoint_url

AWS Toolkit for VS Code の Explorer を使うと VS Code から直接 AWS リソースを確認できる.しかし今までは endpoint_url を書き換える機能がなく,LocalStack (localhost) に接続できないという課題があった.AWS Toolkit for VS Code 側には数年前から issue は出ていて,個人的にもずっとウォッチしていた👀

github.com

今回のリリースによって AWS Toolkit for VS Code から LocalStack (localhost) に接続できるようになった.~/.aws/config ファイルに以下のようなプロファイルを設定しておくと VS Code から接続できる.

[profile localstack]
region = ap-northeast-1
output = json
endpoint_url = http://localhost.localstack.cloud:4566

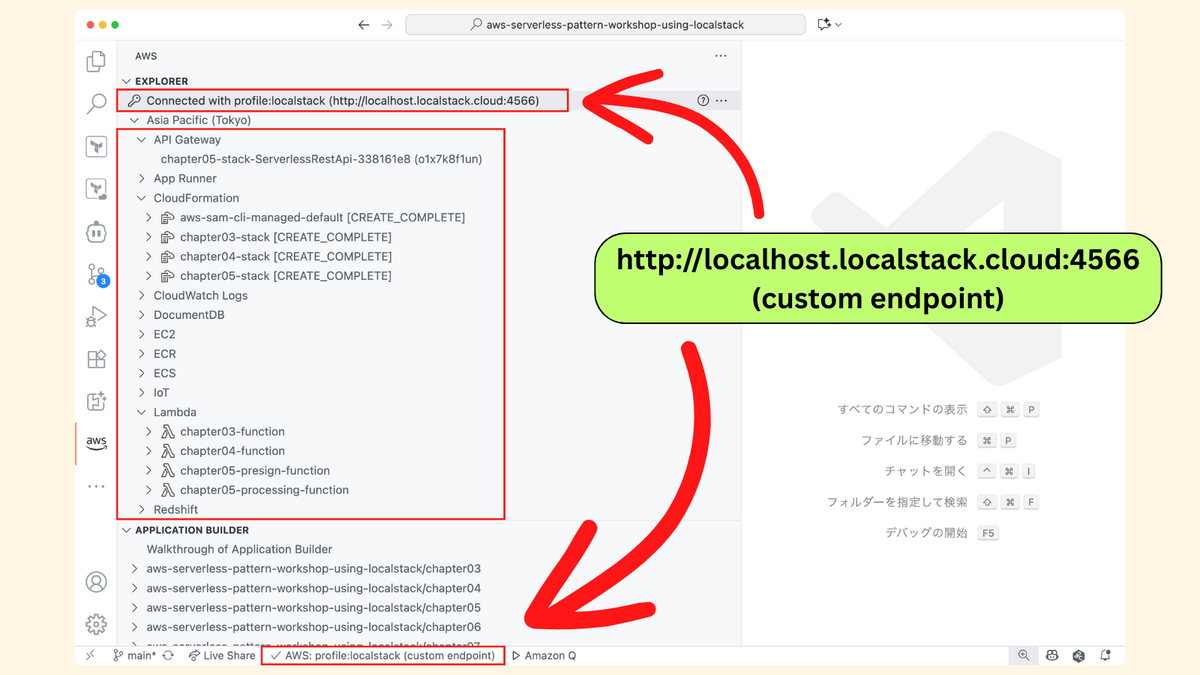
Connected with profile:localstack (http://localhost.localstack.cloud:4566) と表示されている👌

LocalStack Toolkit

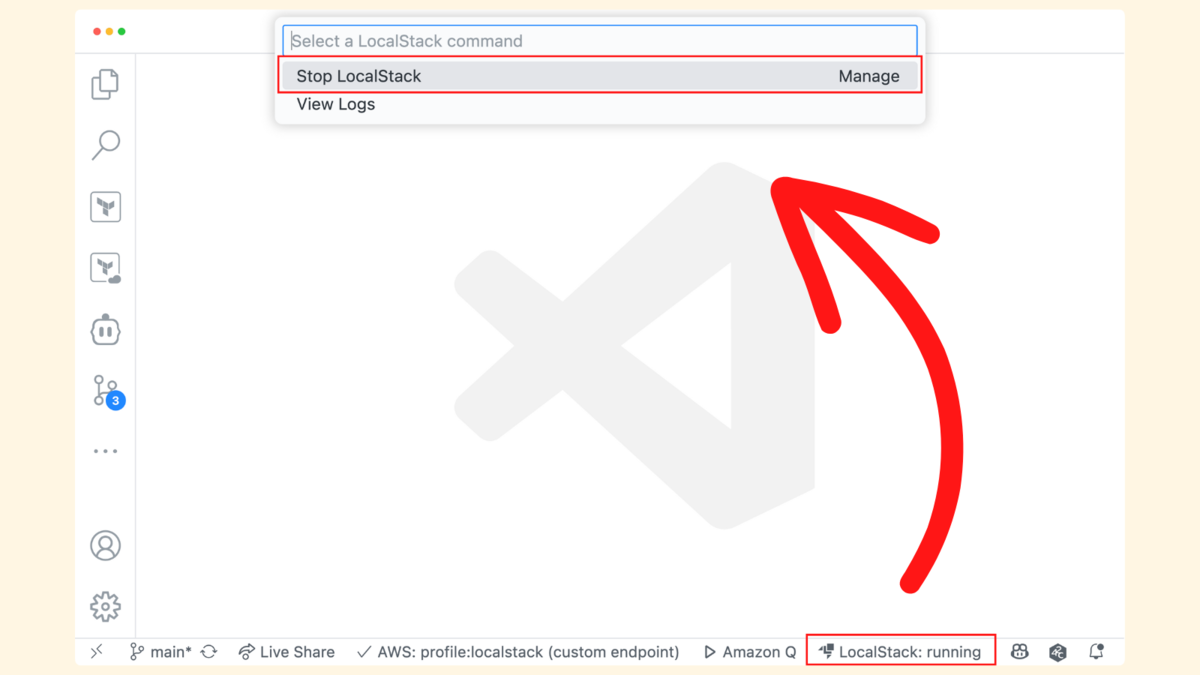
さらに LocalStack Toolkit(VS Code 拡張機能)を使うと VS Code のステータスバーから LocalStack を簡単に起動/停止できるようにもなっていた.

marketplace.visualstudio.com

よって LocalStack Toolkit から直接 LocalStack を起動して,AWS Toolkit for VS Code で AWS リソースをデプロイして,そのままテストできるようになった❗️確かに統合された感じがする.詳細はドキュメントにもまとまっていた.

docs.aws.amazon.com

試す

今回のアップデートを詳細に試すために「LocalStack 実践入門 | AWS サーバレスパターン開発ワークショップ」の Chapter.3 をローカル環境で試す.

zenn.dev

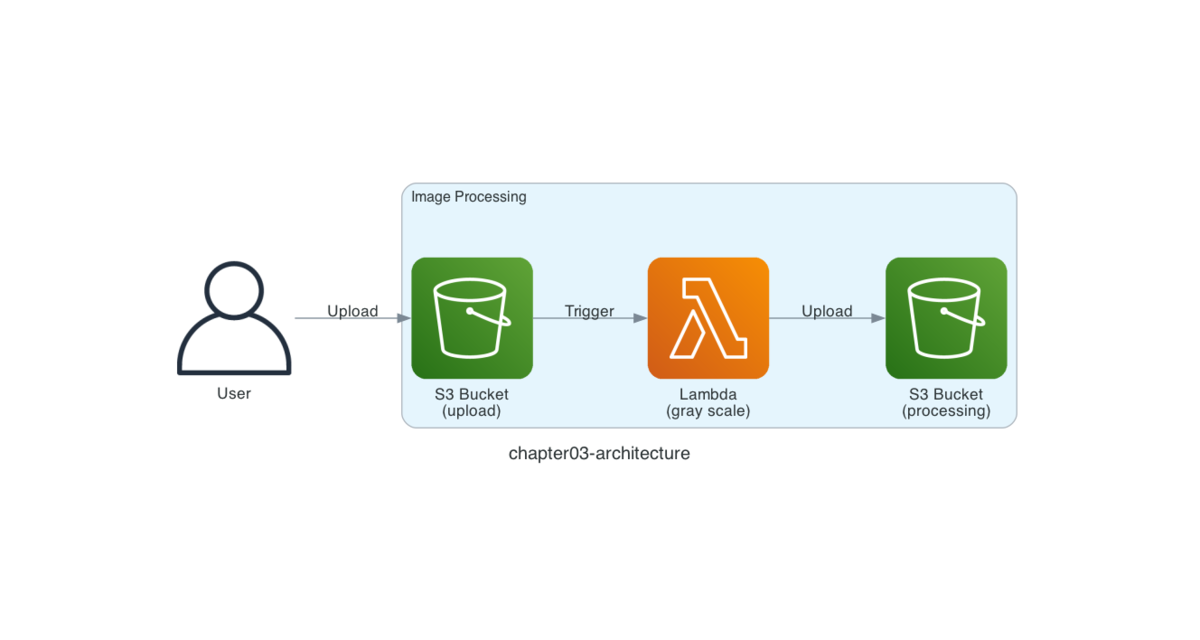
デプロイするアーキテクチャは以下のような感じ😀

画像処理をしよう|LocalStack 実践入門 | AWS サーバレスパターン開発ワークショップ より引用

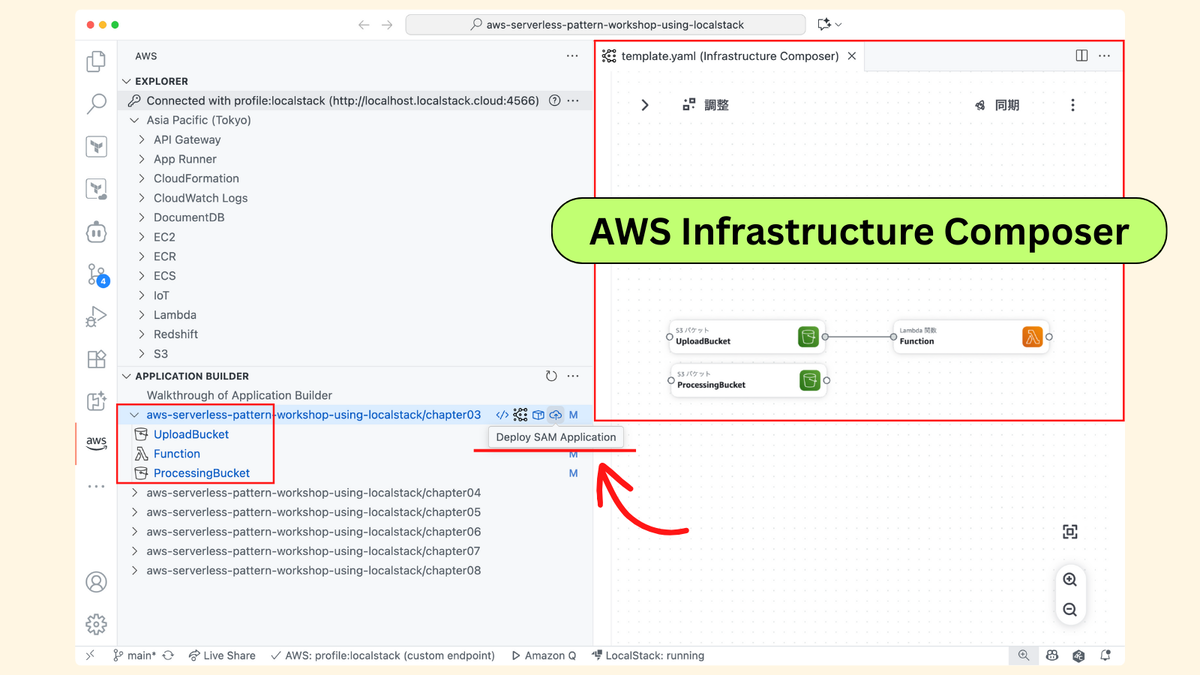
まずは AWS Toolkit for VS Code の Application Builder で Deploy SAM Application を選択してサーバレスアプリケーションを LocalStack 上にデプロイする.ちなみに AWS Toolkit for VS Code で AWS SAM テンプレート template.yamlAWS Infrastructure Composer で表示することもできる(ちょっと微妙ではあるけど...😇).

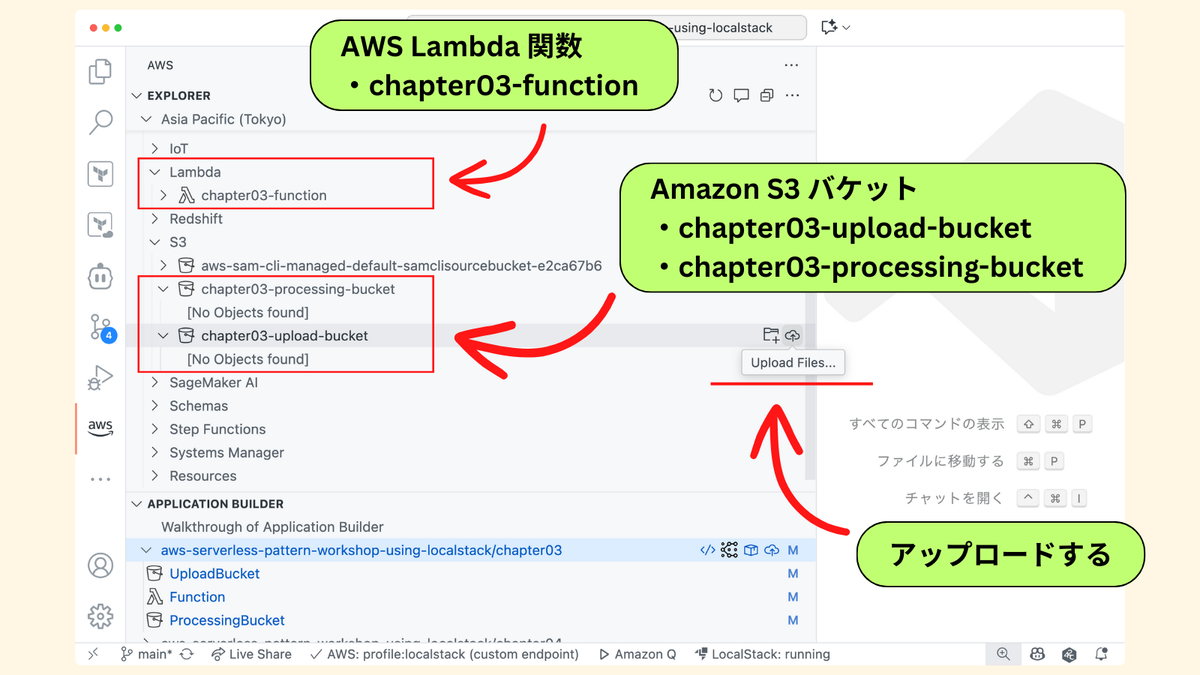
サーバレスアプリケーションをデプロイすると,AWS Toolkit for VS Code で AWS Lambda 関数・Amazon S3 バケットを確認できるようになった👌さらに Upload Files... から AWS Lambda のサービスアイコン (.png) をアップロードする.

すると LocalStack 上で AWS Lambda 関数が実行されて,自動的にグレースケールに画像処理された AWS Lambda のサービスアイコン (.png) が Amazon S3 バケットにアップロードされた.イイ感じ \( 'ω')/

まとめ

さっそく AWS Toolkit for VS Code と LocalStack の統合を試してみた❗️

個人的には LocalStack に慣れてるから AWS Toolkit for VS Code と統合されてなくても LocalStack AWS CLI(awslocal コマンド)と LocalStack Resource Browser があれば十分だな〜とも思うけど,今回のリリースをきっかけに LocalStack の認知度や活用が進むのであれば良いなと \( 'ω')/ とにかく AWS 公式から LocalStack の名前が出るだけで嬉しいな〜とも思う😀

関連記事

AWS Toolkit for VS Code の Application Builder で Walkthrough of Application Builder メニューを使ってステップ・バイ・ステップにセットアップを進めていく手順が紹介されていた.

aws.amazon.com

LocalStack v4.8.0 のリリースノートに AWS Toolkit for VS Code 統合の件が載っていた.

github.com

LocalStack 実践入門シリーズ📕

もし LocalStack に興味を持ってもらえたら LocalStack に入門できる ZennBook(ワークショップ形式)を公開しているので合わせて読んでもらえたらと💪

zenn.dev

zenn.dev

zenn.dev

AWS アカウント不要!LocalStack x Pulumi で入門ワークショップ「Get started with Pulumi and AWS」を試そう

Pulumi の入門ワークショップ「Get started with Pulumi and AWS」を AWS アカウントを使わずに LocalStack で試してみて,最終的に問題なくできた❗️取り組んだ内容をまとめておく.できる限りワークショップの手順と合わせながら紹介しようと思う.

www.pulumi.com

セットアップ

Install Pulumi セクションでセットアップをするときに追加で LocalStack CLI(localstack コマンド)LocalStack AWS CLI(awslocal コマンド)LocalStack Pulumi CLI(pulumilocal コマンド)もセットアップしておく.pulumilocal コマンドは Pulumi CLI(pulumi コマンド)のラッパーで LocalStack に対してデプロイするための設定を生成してくれる👌

github.com

docs.localstack.cloud

$ localstack --version
LocalStack CLI 4.7.0

$ aws --version
aws-cli/2.28.25 Python/3.13.7 Darwin/24.6.0 exe/x86_64
$ awslocal --version
aws-cli/2.28.25 Python/3.13.7 Darwin/24.6.0 exe/x86_64

$ pulumi version
v3.192.0
$ pulumilocal version
v3.192.0

ちなみに pulumilocal コマンドでは CONFIG_STRATEGY という環境変数で設定ファイルのマージ戦略を指定できる.値としては overwriteoverrideseparation から選択できる.個人的には通常の設定を汚さずに使える override もしくは separation を使いたかったけどエラーが出てしまってうまく使えなかった(実装が間違っていそうな予感がする😇).今回は overwrite にしておく.

$ export CONFIG_STRATEGY=overwrite

なお Configure access to AWS セクションで aws sts get-caller-identity コマンドを実行していて,awslocal コマンドを使うと以下のようになる.

$ awslocal sts get-caller-identity
{
    "UserId": "AKIAIOSFODNN7EXAMPLE",
    "Account": "000000000000",
    "Arn": "arn:aws:iam::000000000000:root"
}

バックエンド設定

Terraform と同じように Pulumi にもインフラ側の状態を管理するための「ステートバックエンド」という仕組みがある.デフォルトでは Pulumi Cloud を使うことになっていて,LocalStack と統合する場合も問題なく使えるけど,今回はローカル環境に統一するために DIY バックエンド(ローカルバックエンド)を使う.

よって,Create a new project セクションでプロジェクトを初期化する前に,以下のように環境変数 PULUMI_CONFIG_PASSPHRASEPULUMI_BACKEND_URL をエクスポートしておく.

$ export PULUMI_CONFIG_PASSPHRASE=mypassphrase
$ export PULUMI_BACKEND_URL=file://$(pwd)

ステートバックエンドに関してはドキュメントに詳しくまとまっている.Terraform でお馴染みの「Amazon S3 バックエンド」もある👀

www.pulumi.com

pulumilocal new

そして Create a new project セクションでプロジェクトを初期化する.ここで pulumilocal コマンドを使う💡対話形式で設定を進めると Pulumi のデフォルト構成で初期化される.今回はローカルバックエンドを使うため .pulumi ディレクトリも存在する👌

$ pulumilocal new aws-typescript

$ tree -L 1 -a .
.
├── .git
├── .gitignore
├── .pulumi
├── index.ts
├── node_modules
├── package-lock.json
├── package.json
├── Pulumi.dev.yaml
├── Pulumi.yaml
├── README.md
└── tsconfig.json

4 directories, 8 files

$ tree -L 3 .pulumi
.pulumi
├── locks
│   └── organization
│       └── pulumi-start-aws-localstack
├── meta.yaml
├── meta.yaml.attrs
└── stacks
    └── pulumi-start-aws-localstack
        ├── dev.json
        ├── dev.json.attrs
        ├── dev.json.bak
        └── dev.json.bak.attrs

6 directories, 6 files

pulumilocal up

Deploy to AWS セクションでデプロイするときにも pulumilocal コマンドを使う💡そして pulumilocal up コマンドを実行すると Amazon S3 バケットをデプロイできた.また .pulumi/stacks/pulumi-start-aws-localstack/dev.json ファイルにはステートが書き込まれていた.

$ pulumilocal up
Stack config file ./Pulumi.dev.yaml already exists. File will be overwritten.
        Only 'yes' will be accepted to approve.
        Enter a value: yes
Updating this Stack with LocalStack config
Previewing update (dev):
     Type                 Name                             Plan       
 +   pulumi:pulumi:Stack  pulumi-start-aws-localstack-dev  create     
 +   └─ aws:s3:Bucket     my-bucket                        create     

Outputs:
    bucketName: [unknown]

Resources:
    + 2 to create

Do you want to perform this update? yes
Updating (dev):
     Type                 Name                             Status              
 +   pulumi:pulumi:Stack  pulumi-start-aws-localstack-dev  created (6s)        
 +   └─ aws:s3:Bucket     my-bucket                        created (0.09s)     

Outputs:
    bucketName: "my-bucket-d00e87d"

Resources:
    + 2 created

Duration: 8s

LocalStack Resource Browser で Amazon S3 バケットを確認できる❗️

pulumilocal up(2回目)

Make an update セクションでは Amazon S3 静的ウェブサイトホスティングを設定してスタックをアップデートする.ワークショップの手順に従ってコードを書き換えつつ,もう一度 pulumilocal up コマンドを実行する.

$ pulumilocal up
Stack config file ./Pulumi.dev.yaml already exists. File will be overwritten.
        Only 'yes' will be accepted to approve.
        Enter a value: yes
Updating this Stack with LocalStack config
Previewing update (dev):
     Type                                  Name                             Plan       
     pulumi:pulumi:Stack                   pulumi-start-aws-localstack-dev             
 +   ├─ aws:s3:BucketPublicAccessBlock     public-access-block              create     
 +   ├─ aws:s3:BucketOwnershipControls     ownership-controls               create     
 +   ├─ aws:s3:BucketObject                index.html                       create     
 +   └─ aws:s3:BucketWebsiteConfiguration  website                          create     

Outputs:
  + url       : [unknown]

Resources:
    + 4 to create
    2 unchanged

Do you want to perform this update? yes
Updating (dev):
     Type                                  Name                             Status              
     pulumi:pulumi:Stack                   pulumi-start-aws-localstack-dev                      
 +   ├─ aws:s3:BucketWebsiteConfiguration  website                          created (0.05s)     
 +   ├─ aws:s3:BucketOwnershipControls     ownership-controls               created (0.04s)     
 +   ├─ aws:s3:BucketPublicAccessBlock     public-access-block              created (0.04s)     
 +   └─ aws:s3:BucketObject                index.html                       created (0.01s)     

Outputs:
    bucketName: "my-bucket-d00e87d"
  + url       : "http://my-bucket-d00e87d.s3-website-us-east-1.amazonaws.com"

Resources:
    + 4 created
    2 unchanged

Duration: 7s

ちなみに LocalStack Resource Browser では Amazon S3 静的ウェブサイトホスティングの設定は確認できないため,AWS CLI で確認して問題なさそうだった.

$ awslocal s3api get-bucket-website --bucket my-bucket-d00e87d
{
    "IndexDocument": {
        "Suffix": "index.html"
    }
}

さらにワークショップの手順にあるコマンドだと AWS アカウント上にある Amazon S3 静的ウェブサイトホスティングの URL になってしまうため,今回は LocalStack 上にある Amazon S3 静的ウェブサイトホスティングの URL にするため少しコマンドを修正した.

$ pulumi stack output url
http://my-bucket-d00e87d.s3-website-us-east-1.amazonaws.com

$ echo http://$(pulumi stack output bucketName).s3-website.us-east-1.localhost.localstack.cloud:4566  
http://my-bucket-d00e87d.s3-website.us-east-1.localhost.localstack.cloud:4566

$ curl http://my-bucket-d00e87d.s3-website.us-east-1.localhost.localstack.cloud:4566
<html>
    <body>
        <h1>Hello, Pulumi!</h1>
    </body>
</html>

LocalStack も Amazon S3 静的ウェブサイトホスティングをサポートしているため LocalStack 上にある Amazon S3 静的ウェブサイトホスティングで index.html を表示することができた👌

pulumilocal up(3回目)

Create a component ではデプロイした構成を Pulumi のコンポーネントとしてリファクタリングして再デプロイするという内容になっている.ワークショップの手順に従ってコードを書き換えつつ,pulumilocal up コマンドを実行すれば OK👌Amazon S3 バケットは作り直される前提の手順になっていてそこは問題なし.

$ pulumilocal up  
Stack config file ./Pulumi.dev.yaml already exists. File will be overwritten.
        Only 'yes' will be accepted to approve.
        Enter a value: yes
Updating this Stack with LocalStack config
Previewing update (dev):
     Type                                     Name                             Plan       
     pulumi:pulumi:Stack                      pulumi-start-aws-localstack-dev             
 +   ├─ quickstart:index:AwsS3Website         my-website                       create     
 +   │  ├─ aws:s3:Bucket                      my-bucket                        create     
 +   │  ├─ aws:s3:BucketOwnershipControls     ownership-controls               create     
 +   │  ├─ aws:s3:BucketWebsiteConfiguration  website                          create     
 +   │  ├─ aws:s3:BucketObject                index.html                       create     
 +   │  └─ aws:s3:BucketPublicAccessBlock     public-access-block              create     
 -   ├─ aws:s3:BucketObject                   index.html                       delete     
 -   ├─ aws:s3:BucketOwnershipControls        ownership-controls               delete     
 -   ├─ aws:s3:BucketPublicAccessBlock        public-access-block              delete     
 -   ├─ aws:s3:BucketWebsiteConfiguration     website                          delete     
 -   └─ aws:s3:Bucket                         my-bucket                        delete     

Outputs:
  - bucketName: "my-bucket-d00e87d"

Resources:
    + 6 to create
    - 5 to delete
    11 changes. 1 unchanged

Do you want to perform this update? yes
Updating (dev):
     Type                                     Name                             Status              
     pulumi:pulumi:Stack                      pulumi-start-aws-localstack-dev                      
 +   ├─ quickstart:index:AwsS3Website         my-website                       created (5s)        
 +   │  ├─ aws:s3:Bucket                      my-bucket                        created (0.07s)     
 +   │  ├─ aws:s3:BucketOwnershipControls     ownership-controls               created (0.01s)     
 +   │  ├─ aws:s3:BucketPublicAccessBlock     public-access-block              created (0.01s)     
 +   │  ├─ aws:s3:BucketWebsiteConfiguration  website                          created (0.02s)     
 +   │  └─ aws:s3:BucketObject                index.html                       created (0.01s)     
 -   ├─ aws:s3:BucketObject                   index.html                       deleted (0.01s)     
 -   ├─ aws:s3:BucketOwnershipControls        ownership-controls               deleted (0.01s)     
 -   ├─ aws:s3:BucketWebsiteConfiguration     website                          deleted (0.01s)     
 -   ├─ aws:s3:BucketPublicAccessBlock        public-access-block              deleted (0.01s)     
 -   └─ aws:s3:Bucket                         my-bucket                        deleted (0.01s)     

Outputs:
  - bucketName: "my-bucket-d00e87d"
  ~ url       : "http://my-bucket-d00e87d.s3-website-us-east-1.amazonaws.com" => "http://my-bucket-d55080e.s3-website-us-east-1.amazonaws.com"

Resources:
    + 6 created
    - 5 deleted
    11 changes. 1 unchanged

Duration: 7s

LocalStack Resource Browser で作り直された Amazon S3 バケットも確認できて成功❗️

pulumilocal destroy と pulumilocal stack rm

最後に Cleanup & destroy the stack セクションでお掃除をしておく.

$ pulumilocal destroy
$ pulumilocal stack rm

まとめ

LocalStack を使えば AWS アカウントを使わずに Pulumi の入門ワークショップ「Get started with Pulumi and AWS」を試せた❗️引き続きどんどん試していくぞ〜

Amazon S3 Vectors に入門できるコンテンツ「Tutorial: Getting started with S3 Vectors」

2025年7月15日にプレビューでリリースされた Amazon S3 Vectors を試してみたいな〜❗️と思って,ドキュメントにある公式チュートリアル「Tutorial: Getting started with S3 Vectors」を試してみた.

docs.aws.amazon.com

Amazon S3 Vectors に入門できる最高のコンテンツだった.Amazon S3 Vectors の基礎・Amazon S3 Vectors Embed CLI・Amazon Bedrock ナレッジベース統合・Amazon OpenSearch Service 統合まで幅広く体験できる👏

Amazon S3 Vectors 入門

Step 1 から Step 4 では Amazon S3 Vectors に入門する.今回リージョンは us-east-1 を使うことにした🌍️

まず Step 1Step 2 ではマネジメントコンソールから Amazon S3 の「ベクトルバケット(kakakakakku-media-embeddings)」「ベクトルインデックス(movies)」を作った.ちなみにマネジメントコンソールではベクトルバケットとベクトルインデックスを削除するメニューがなく,ドキュメントを確認したところ You can't delete a vector bucket or vector index using the console. と書いてあった😇現状では AWS CLI・AWS SDK で削除する必要がある.

docs.aws.amazon.com

Step 3 では Boto3 を使ってベクトルインデックスにベクトルを登録する.エンベディングするモデルとしては Amazon Titan Text Embedding v2 を使う.基本的にはチュートリアルにあるコードをそのまま使っていて,region_namevectorBucketName を書き換えた.ベクトルとして登録する映画データとしては Star Wars(スター・ウォーズ)Jurassic Park(ジュラシック・パーク)Finding Nemo(ファインディング・ニモ) になっていた🎥

👾 put-vectors.py

# Populate a vector index with embeddings from Amazon Titan Text Embeddings V2.
import boto3
import json

# Create Bedrock Runtime and S3 Vectors clients in the AWS Region of your choice. 
bedrock = boto3.client("bedrock-runtime", region_name="us-east-1")
s3vectors = boto3.client("s3vectors", region_name="us-east-1")

# Texts to convert to embeddings.
texts = [
    "Star Wars: A farm boy joins rebels to fight an evil empire in space", 
    "Jurassic Park: Scientists create dinosaurs in a theme park that goes wrong",
    "Finding Nemo: A father fish searches the ocean to find his lost son"
]

# Generate vector embeddings.
embeddings = []
for text in texts:
    response = bedrock.invoke_model(
        modelId="amazon.titan-embed-text-v2:0",
        body=json.dumps({"inputText": text})
    )

    # Extract embedding from response.
    response_body = json.loads(response["body"].read())
    embeddings.append(response_body["embedding"])

# Write embeddings into vector index with metadata.
s3vectors.put_vectors(
    vectorBucketName="kakakakakku-media-embeddings",   
    indexName="movies",   
    vectors=[
        {
            "key": "Star Wars",
            "data": {"float32": embeddings[0]},
            "metadata": {"source_text": texts[0], "genre":"scifi"}
        },
        {
            "key": "Jurassic Park",
            "data": {"float32": embeddings[1]},
            "metadata": {"source_text": texts[1], "genre":"scifi"}
        },
        {
            "key": "Finding Nemo",
            "data": {"float32": embeddings[2]},
            "metadata": {"source_text": texts[2], "genre":"family"}
        }
    ]
)

実行後に登録されたベクトルを確認してみたいな〜と思って,AWS CLI を使って取得してみた.aws s3vectors list-vectors コマンドや aws s3vectors get-vectors コマンドで確認できる.ちなみにデフォルトではベクトルは確認できず,--return-data オプションを指定する必要がある👌

docs.aws.amazon.com

docs.aws.amazon.com

$ aws s3vectors list-vectors \
    --vector-bucket-name kakakakakku-media-embeddings \
    --index-name movies \
    --region us-east-1
{
    "vectors": [
        {
            "key": "Star Wars"
        },
        {
            "key": "Jurassic Park"
        },
        {
            "key": "Finding Nemo"
        }
    ]
}

$ aws s3vectors get-vectors \
    --vector-bucket-name kakakakakku-media-embeddings \
    --index-name movies \
    --keys "Star Wars" \
    --return-data \
    --region us-east-1
{
    "vectors": [
        {
            "key": "Star Wars",
            "data": {
                "float32": [
                    -0.024966709315776825,
                    0.03783351927995682,
                    -0.026106879115104675,
                    0.0013980172807350755,
                    0.04545948654413223,
(中略)
                    -0.015926586464047432,
                    -0.03523598983883858
                ]
            }
        }
    ]
}

Step 4 では同じく Boto3 を使ってベクトルを検索する.検索キーワードは adventures in space になっていた.実装としては s3vectors.query_vectors() を2回実行していて,2回目は filter={"genre": "scifi"}, でメタデータフィルタを追加した検索になっている🔍️

👾 query-vectors.py

# Query a vector index with an embedding from Amazon Titan Text Embeddings V2.
import boto3 
import json 

# Create Bedrock Runtime and S3 Vectors clients in the AWS Region of your choice. 
bedrock = boto3.client("bedrock-runtime", region_name="us-east-1")
s3vectors = boto3.client("s3vectors", region_name="us-east-1") 

# Query text to convert to an embedding. 
input_text = "adventures in space"

# Generate the vector embedding.
response = bedrock.invoke_model(
    modelId="amazon.titan-embed-text-v2:0",
    body=json.dumps({"inputText": input_text})
) 

# Extract embedding from response.
model_response = json.loads(response["body"].read())
embedding = model_response["embedding"]

# Query vector index.
response = s3vectors.query_vectors(
    vectorBucketName="kakakakakku-media-embeddings",
    indexName="movies",
    queryVector={"float32": embedding}, 
    topK=3, 
    returnDistance=True,
    returnMetadata=True
)
print(json.dumps(response["vectors"], indent=2))

# Query vector index with a metadata filter.
response = s3vectors.query_vectors(
    vectorBucketName="kakakakakku-media-embeddings",
    indexName="movies",
    queryVector={"float32": embedding}, 
    topK=3, 
    filter={"genre": "scifi"},
    returnDistance=True,
    returnMetadata=True
)
print(json.dumps(response["vectors"], indent=2))

👾 query-vectors.py(実行結果)

1回目と2回目の検索結果が出力された👌

$ uv run query-vectors.py
[
  {
    "key": "Star Wars",
    "metadata": {
      "source_text": "Star Wars: A farm boy joins rebels to fight an evil empire in space",
      "genre": "scifi"
    },
    "distance": 0.7918925285339355
  },
  {
    "key": "Jurassic Park",
    "metadata": {
      "genre": "scifi",
      "source_text": "Jurassic Park: Scientists create dinosaurs in a theme park that goes wrong"
    },
    "distance": 0.859985888004303
  },
  {
    "key": "Finding Nemo",
    "metadata": {
      "genre": "family",
      "source_text": "Finding Nemo: A father fish searches the ocean to find his lost son"
    },
    "distance": 0.9480686187744141
  }
]
[
  {
    "key": "Star Wars",
    "metadata": {
      "source_text": "Star Wars: A farm boy joins rebels to fight an evil empire in space",
      "genre": "scifi"
    },
    "distance": 0.7918925285339355
  },
  {
    "key": "Jurassic Park",
    "metadata": {
      "genre": "scifi",
      "source_text": "Jurassic Park: Scientists create dinosaurs in a theme park that goes wrong"
    },
    "distance": 0.859985888004303
  }
]

Amazon S3 Vectors Embed CLI

次はオプションタスクとして,ベクトル操作(Put と Query)を簡単に行える Amazon S3 Vectors Embed CLI を試す❗️

docs.aws.amazon.com

とは言え特に手順はなく,GitHub リポジトリの README を参照して試してね〜という流れになっていた.

github.com

まずは sandbox というベクトルインデックスを作った.今度はマネジメントコンソールではなく AWS CLI の aws s3vectors create-index コマンドを使ってみることにした.

$ aws s3vectors create-index \
    --vector-bucket-name kakakakakku-media-embeddings \
    --index-name sandbox \
    --data-type float32 \
    --dimension 1024 \
    --distance-metric cosine

そして README を参考に s3vectors-embed put コマンドと s3vectors-embed query コマンドを実行した👌

$ uvx --from s3vectors-embed-cli s3vectors-embed put \
  --vector-bucket-name kakakakakku-media-embeddings \
  --index-name sandbox \
  --model-id amazon.titan-embed-text-v2:0 \
  --text-value 'Hello, world!' \
  --region us-east-1
{
  "key": "54e0a292-d760-4ff6-a315-61663d7a785b",
  "bucket": "kakakakakku-media-embeddings",
  "index": "sandbox",
  "model": "amazon.titan-embed-text-v2:0",
  "contentType": "text",
  "embeddingDimensions": 1024,
  "metadata": {
    "S3VECTORS-EMBED-SRC-CONTENT": "Hello, world!"
  }
}

$ uvx --from s3vectors-embed-cli s3vectors-embed query \
  --vector-bucket-name kakakakakku-media-embeddings \
  --index-name sandbox \
  --model-id amazon.titan-embed-text-v2:0 \
  --query-input 'Hello!' \
  --k 5 \
  --region us-east-1
{
  "results": [
    {
      "key": "54e0a292-d760-4ff6-a315-61663d7a785b",
      "metadata": {
        "S3VECTORS-EMBED-SRC-CONTENT": "Hello, world!"
      }
    }
  ],
  "summary": {
    "queryType": "text",
    "model": "amazon.titan-embed-text-v2:0",
    "index": "sandbox",
    "resultsFound": 1,
    "queryDimensions": 1024
  }
}

他にも試していたら README に誤りがあることに気付いて,修正のプルリクエストを出しておいた👌

github.com

Amazon Bedrock ナレッジベース統合

オプションタスクの2つ目として Amazon S3 Vectors と「Amazon Bedrock ナレッジベース」の統合を試す❗️こっちは基本的な手順があって,参考にしながら進めることができた.

docs.aws.amazon.com

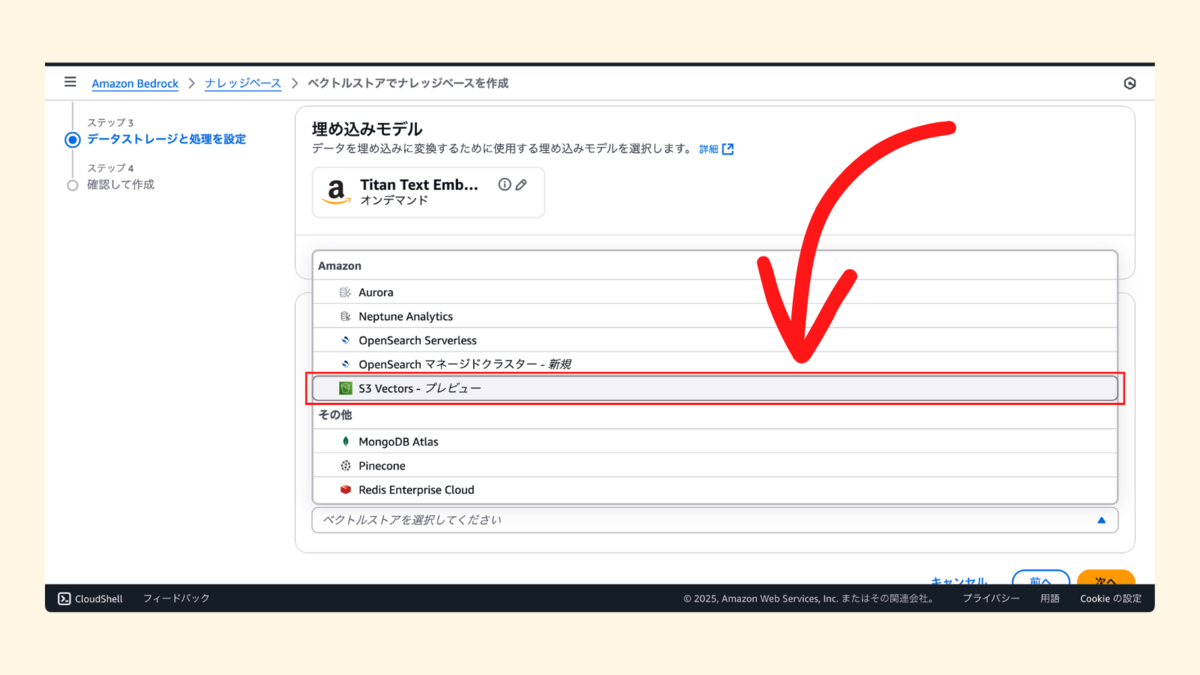
ちなみに Amazon Bedrock ナレッジベースは過去にも使ったことがあって,手順を参考にポチポチと設定した.ポイントは「ベクトルデータベース」を設定するときに Amazon S3 Vectors を選択するところ👌

ちなみに「ベクトルデータベース」を設定するときに既に作ってある「ベクトルインデックス」を指定したらハマってしまった😇Amazon Bedrock ナレッジベースで Amazon S3 にアップロードした PDF ファイルを同期するときに Filterable metadata must have at most 2048 bytes というエラーが出てしまった.

Encountered error: Invalid record for key '3bf6136e-8097-499e-ba64-591230bc7b78': Filterable metadata must have at most 2048 bytes (Service: S3Vectors, Status Code: 400, Request ID: 4a6c87ca-c46f-413b-a1ab-e4e8660e7e91) (SDK Attempt Count: 1). Call to Amazon S3 Vectors did not succeed.

解決策はドキュメントにちゃんと書いてあって,「ベクトルインデックス」を作るときに nonFilterableMetadataKeys(フィルタリングできないメタデータ)AMAZON_BEDROCK_TEXT を指定する必要があった.ちなみに確認も兼ねてマネジメントコンソールで「新しいベクトルストアをクイック作成 - 推奨」を選択して「ベクトルインデックス」を作ってみたところ,デフォルトで AMAZON_BEDROCK_TEXT 以外に AMAZON_BEDROCK_METADATA も設定される仕様になっていることを確認できた💡

docs.aws.amazon.com

というハマりポイントもありつつ,最終的に以下のように「ベクトルインデックス」を作り直して,Amazon Bedrock ナレッジベースの同期ができるようになった👏

$ aws s3vectors create-index \
    --vector-bucket-name kakakakakku-media-embeddings \
    --index-name integrated-knowledge-base \
    --data-type float32 \
    --dimension 1024 \
    --distance-metric cosine \
    --metadata-configuration nonFilterableMetadataKeys=AMAZON_BEDROCK_TEXT,AMAZON_BEDROCK_METADATA

そして aws s3vectors list-vectors コマンドでベクトル一覧を確認できた👌

$ aws s3vectors list-vectors \
    --vector-bucket-name kakakakakku-media-embeddings \
    --index-name integrated-knowledge-base \
    --region us-east-1
{
    "vectors": [
        {
            "key": "8c9a8cec-b957-4caf-9c39-969efbdb1ab3"
        },
        {
            "key": "716e3806-4c79-43be-9f2b-826a94324e6b"
        },
        {
            "key": "f4ccd138-aeef-44e5-9d83-c604c37525c8"
        },
(中略)
        {
            "key": "c26f25c6-3d90-4e6d-8df6-abf07c35abcb"
        },
        {
            "key": "3b4024a9-7522-48ba-b901-b800bc996907"
        }
    ]
}

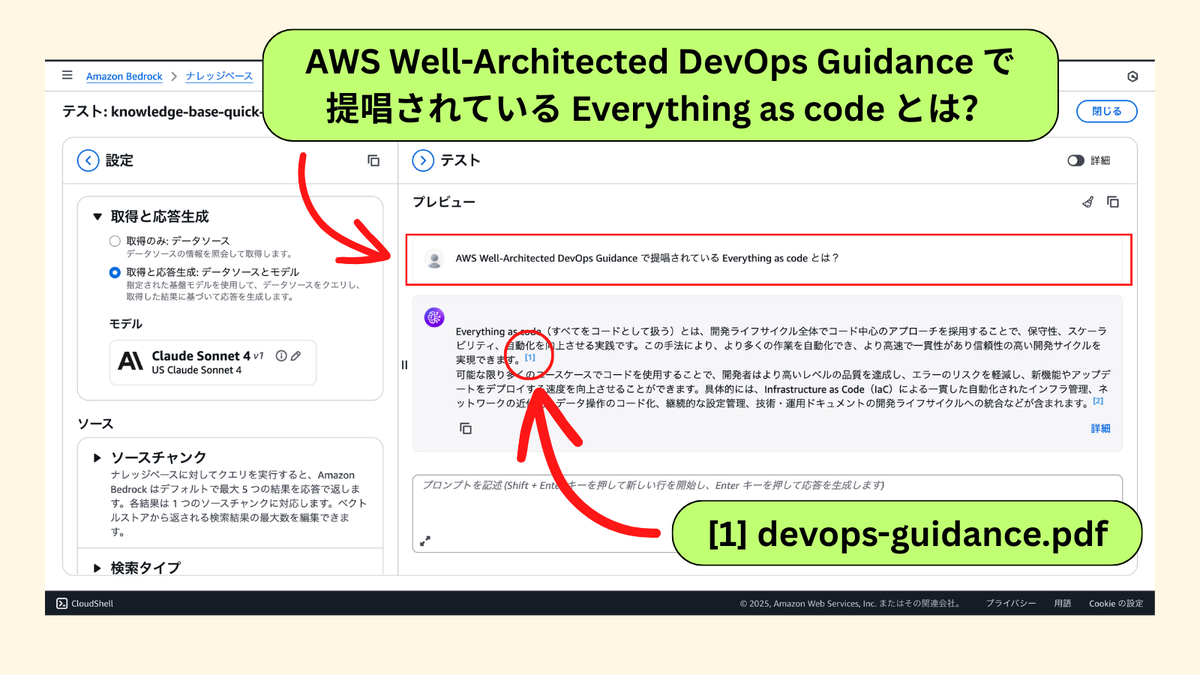
今回は AWS Well-Architected DevOps Guidance の PDF(236ページ)を Amazon Bedrock ナレッジベースに同期して AWS Well-Architected DevOps Guidance で提唱されている Everything as code とは? というプロンプトを実行したらイイ感じに回答が返ってきた \( 'ω')/

docs.aws.amazon.com

Amazon OpenSearch Service 統合

今回は試さなかった🙅

まとめ

「Tutorial: Getting started with S3 Vectors」は Amazon S3 Vectors に入門するのに最適なコンテンツだった❗️そろそろ Amazon S3 Vectors を試してみようかな〜と思っている人がいたらおすすめできる \( 'ω')/

関連記事

aws.amazon.com

aws.amazon.com